

Overview
The Wasabi AB Testing service is from Intuit Data Engineering and Analytics (IDEA) based on a set of RESTful APIs that allow you to instrument your product code for AB tests (also called split tests), and then create and manage experiments and track and analyze results. We also provide a user interface for experiment management and tracking results. If you are looking for a simple, flexible, and scalable way to run AB test experiments in your product, you’re in the right place.
Wasabi enables you to:
- Create and manage experiments via API or through our web UI.
- Instrument your product code to run an AB test experiment via simple REST API calls:
- Assign users to a bucket (A, B. C, …), then you show them the version of the experience you want them to see (treatment).
- Log impressions when users have been exposed to the treatment.
- Log one or more kinds of actions the users may take in response to the treatment (your success metrics).
- View your experiment results to find the winning bucket and see statistical significance (via API or web UI).
- Immediately roll out your winning experience to all users until you can implement it in your product code.
Where can I use AB testing? (almost anywhere)
- Web clients
- Mobile clients
- Desktop clients (with an internet connection)
- Server-side clients
- Can be called from client-side or server-side code
- Can run experiments across multiple platforms if you have a common user identifier
What kinds of experiments can I run?
- Visual elements and content (e.g. red button vs. blue button)
- Multi-page work flows
- Dynamic single-page client experiences
- Back-end algorithms (e.g. compare recommendation algorithms) and much, much more!
This document explains the features of the Wasabi AB Testing service and gives guidance on how to use them. Note that everything that you can do within the User Interface (UI) is also available via the REST APIs.
Overall Architecture

Core Concepts
Bucket
Users going through an experiment are randomly assigned to a bucket (bucket A, bucket B, etc.) which determines which user experience they will be offered. This is often called by other, equivalent names such as variation, treatment group, or recipe.
Assignment
The process by which a user who is a potential subject of the experiment is assigned to one of the buckets, or determined not to be part of the experiment. We use a two roll system for assignment: “roll the dice” once and compare to the Sampling % to determine if the user is in the experiment or not. If the user is in the experiment, then we roll the dice again to determine which bucket the user is in, based on the bucket allocation percentages.
Assignments are durable – once a user (e.g. UserId) is assigned to a particular bucket for an experiment, the AB Testing service will always return the same bucket assignment for that UserId, so the user will get the same experience in the product. Note that this is also true if the user is determined to not be in the experiment (sometimes called a “null assignment”), that is, if you call the AB Testing service for that user’s assignment, you will always be given the “null assignment”.
Impression
Once a user is assigned to a bucket and has been shown the first part of the corresponding user experience or treatment, you record an impression for that user. They become part of the denominator for calculating statistics. This is logically separate from assignment, because in some situations you may assign a user to a bucket before they get to the part of your product where they see the impression of the user experience.
Action
Of all the users who see an impression of a particular user experience, some subset of those may take one or more actions that you are interested in logging and measuring as metrics for the success of that particular treatment. Each different kind of action gives rise to an action rate (roughly actions divided by impressions, usually restricting to unique users). Measuring these action rates and determining when they differ in a statistically significant way is the object of AB testing.
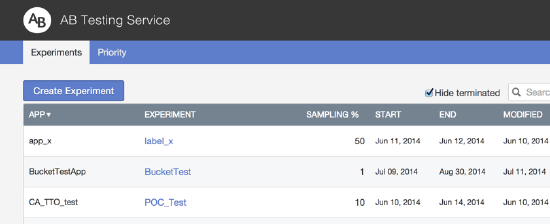
Experiment Admin (Create,Edit, Start, Stop, Terminate)
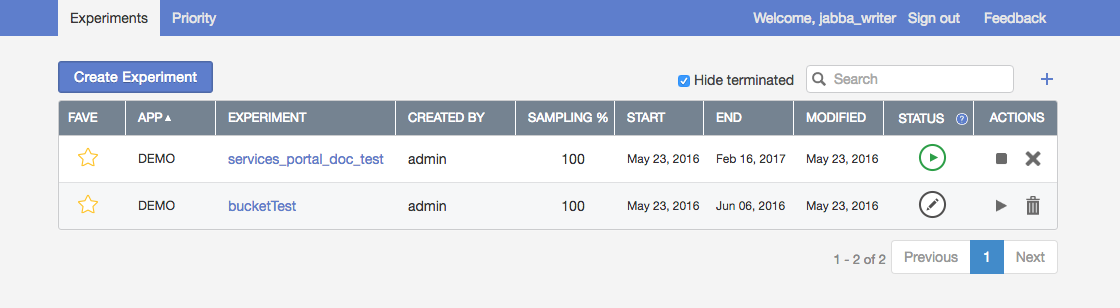
The main administrative user interface of the AB Testing service shows a list of the current experiments, organized by App and Experiment Name.
Concepts and Definitions
App
Defines the application where the experiment runs. For example QBO, or TTO. This functions as a grouping for experiments, and no two experiments within the same App can have the same Experiment Name. This also defines the scope of mutual exclusion between experiments. Finally, access control to administration of the AB Testing service is controlled at an App level. For example, while all users with a Corp login can login to the AB Testing admin UI, only users who have been granted access will be able to see or modify experiments in a given App, e.g., CTG.
Experiment
The name for the experiment, which must be unique within the same App, and should be descriptive. There is also an Experiment UUID, which is not visible in the UI, but is used extensively in the APIs.
NOTE: an experiment name may be re-used after any experiments with that name have been archived.
Sampling %
This is the percentage of users for whom an assignment is requested who will be placed into one of the experiment buckets. In most experiments, the sampling % is relatively small, and only a fraction of the user traffic is put into one of the buckets or experiment variations. The rest of the users receive the default experience. Users who are not assigned to a bucket will be given the assignment value “NULL” from the AB Testing service assignment API (they are given the “null assignment”). Note that the assignment of “NULL” is actually “sticky”, that is, if that user returns to the app and you request their assignment into the experiment again, you will always get the “NULL” value for them.
Rapid Experiment Max Users
Usually, for an A/B test, you want to have users randomly assigned to buckets and run the test for a period of time to try to get statistically significant results.
However, sometimes you just want to try out a test on a few people. Rather than picking a certain sampling percentage and trying to monitor the experiment until you have a sufficiently large number of assignments, you can make the experiment a “rapid experiment”. Note that this is a very unusual situation, so normally, you will not use this feature.
If you do need to use this feature, however, specify the number of users you want in the experiment and when that number of assignments have been made, the experiment will Stop (meaning users will stop being assigned to the experiment, but users who have been assigned will still receive those assignments).
For a stopped experiment, you can increase the maximum number of users and restart the experiment. New users will then start being assigned to the experiment, again, until you’ve reached the newly entered number of users.
Status
The current status of the experiment, as indicated by the icon.
Draft
An experiment which has been created but is not yet running. An experiment collects no data in draft mode and cannot accept incoming assignment or event calls. An experiment in draft mode can still be edited (e.g. you can add more buckets, change bucket allocation percentages, etc.). Most experiment parameters cannot be edited outside of draft mode. The experiment remains in draft mode until it is manually started even if it is past the experiment start date.
Running
An experiment moves from draft to running when you press the start button (as long as the current date is past the start date). A running experiment returns assignments when called, and collects event data (impressions and actions). Note that before you can start the experiment, the total allocation percentages for all the buckets must add up to exactly 100%.
Stopped
A running experiment can be stopped, during which time it continues to return existing assignments for UserIds that have already been assigned, but it does not create any new assignments. It continues to collect event data (impressions and actions) for UserIds that have already been assigned to a bucket. A paused experiment may be set back to the running state.
Stopped (automatic)
A running experiment will be stopped automatically when the experiment End Date is reached. This is a TERMINAL STATE. A stopped experiment cannot be re-started. It may only be archived.
Terminated
A stopped experiment can be terminated. This causes the experiment to stop accepting new or returning existing assignments. This should only be done when you no longer have code that is using this experiment. A terminated experiment can only be deleted.
Deleted
Stopped or terminated experiments may be deleted. Deleted experiments can have their experiment name re-used. Deleted experiments no longer appear in the experiment list UI.
Start Date
The date on which the experiment is allowed to start. Starting the experiment still requires pressing the Play button. If you press Play before the start date, then the experiment will automatically start on that date. If you don’t press Play until after the start date, then the experiment will start when you press Play.
End Date
The date on which the experiment is automatically stopped. A running or paused experiment can be manually stopped by pressing the Stop button at any time.
NOTE: In the future we plan to replace End Date with an optional parameter “Scheduled End Date” instead.
Actions
You can edit a Draft experiment by clicking on the name of the experiment. There are also a set of action buttons which allow you to change the state of the experiment. They consist of Start, Stop, Terminate and Delete.
Creating an Experiment
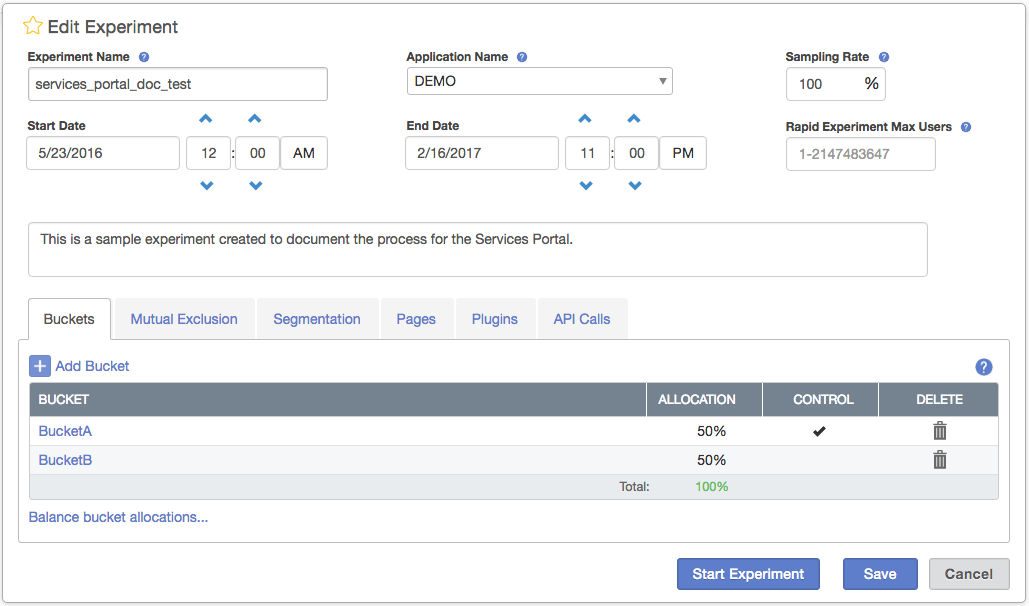
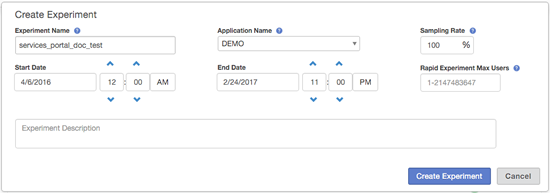
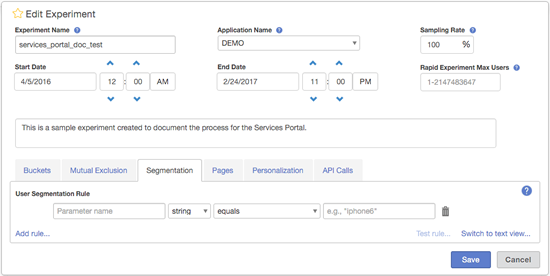
Pressing the Create Experiment button brings up the Create Experiment dialog:
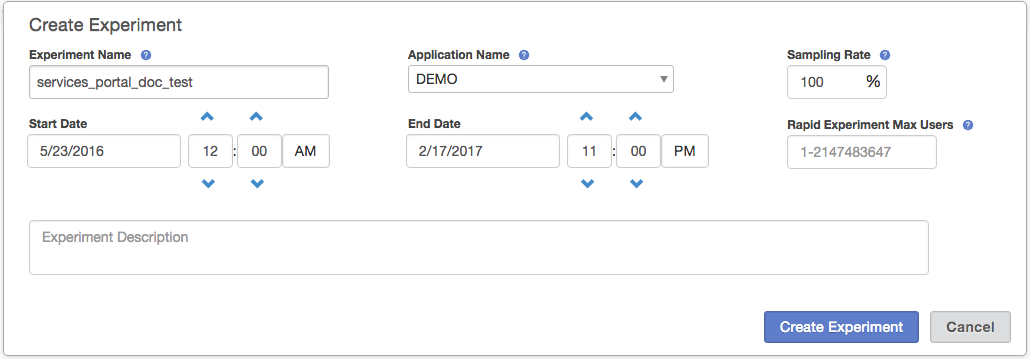
where you enter the Application Name, Experiment Name, Sampling Rate, Start Date, End Date, and a Description for your experiment. Once you fill this in and press Create Experiment, the dialog expands and allows you to create buckets for your new experiment.
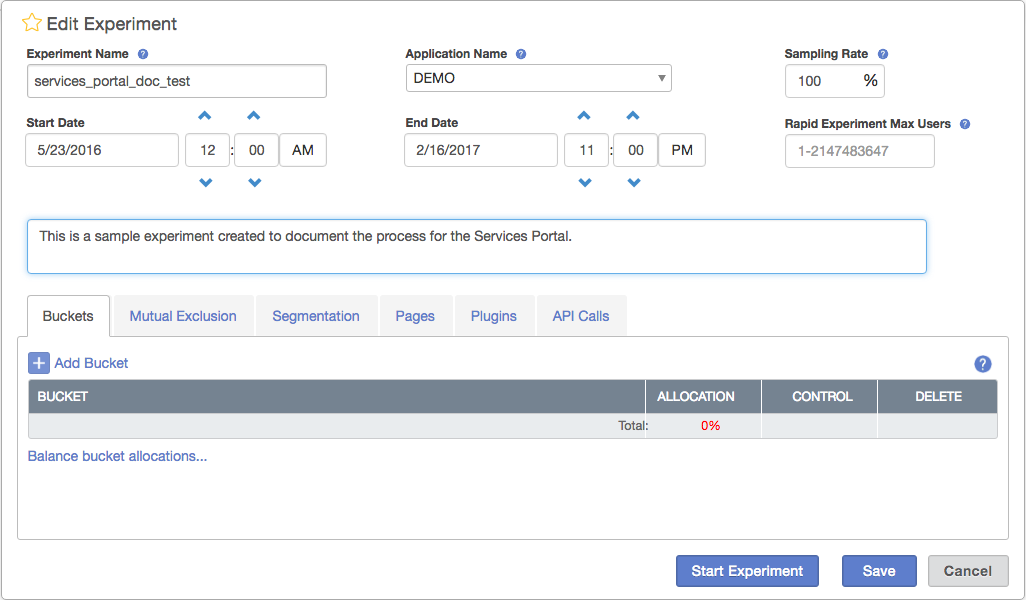
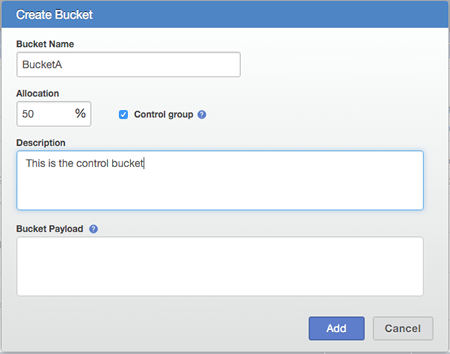
You can also go back and edit name, sampling rate, etc. This is the same dialog box as you see whenever you hit the Edit button for an experiment in Draft mode. If you click on the +Add Bucket link, it brings up the Edit Bucket dialog where you enter the bucket name, bucket allocation %, whether or not the bucket is the Control (e.g. the bucket to which other buckets are compared), an optional description, and an optional bucket payload.
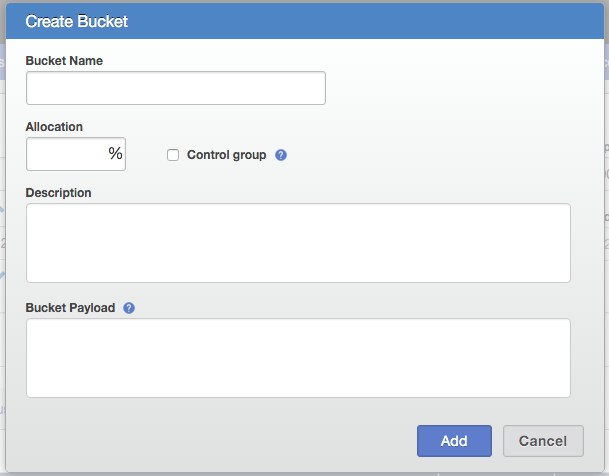
A bucket payload is a piece of text that is returned to the caller with every assignment made to this bucket. It could contain CSS, Javascript code, a URL so you can alter the look and feel for your experiment or redirect the user to a different URL depending on the assignment. This is just a pass through. Whatever information you put in this field will be returned to the caller each time an assignment is made to this bucket.
Note that the bucket allocation % for all buckets in your experiment must sum to 100%, and there cannot be more than one Control bucket. You can edit or delete buckets by clicking on the appropriate buttons next to the buckets in the list.
Edit Experiment
Experiments can only be edited when they are in draft mode. Just click on the experiment name in the experiment list to edit the experiment.
Start Experiment
Clicking on the Play button starts the experiment if it is currently past the Start Date. If it is currently before the Start Date, then it will set the experiment to automatically start on the Start Date. Once an experiment is started, you can no longer access the Edit Experiment mode. Any parameters which can be changed are available via API or in the Track & Manage Experiment UI.
NOTE: In the future we plan to replace Start Date with an optional parameter “Scheduled Start Date” instead.
Stop Experiment
Pressing the Stop button stops the experiment, during which time it continues to return existing assignments for UserIds that have already been assigned, but it does not create any new assignments. It continues to collect event data (impressions and actions) for UserIds that have already been assigned to a bucket. A stopped experiment may be set back to the running state.
Terminate Experiment
Pressing the Terminate button terminates the experiment (this cannot be undone, and there is a dialog to warn you). A running or stopped experiment can be terminated either by explicitly pressing the Terminate button, or calling the API, or automatically stopped when the experiment End Date is reached. Terminated is a TERMINAL STATE. A terminated experiment cannot be re-started. It may only be deleted.
Delete Experiment
Pressing the Delete button deletes the experiment, which removes it from the UI. It can still be accessed via API by its UUID. The experiment and its data are not actually deleted. Deleting an experiment is not reversible, and there is a warning dialog in case you hit the button by accident.
NOTE: The current UI labels this as Delete Experiment. This may be renamed to Archive in an upcoming release.
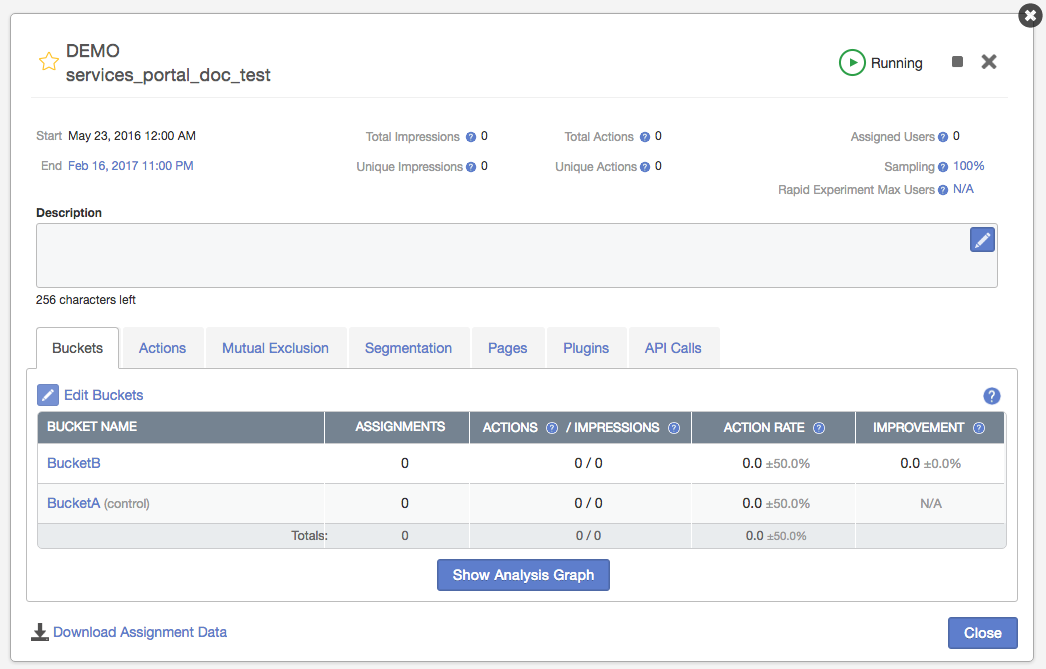
Experiment Tracking & Management
Once your experiment is running, you can access the tracking and management panel by clicking on the experiment name in the list of experiments in the admin UI.
Concepts and Definitions
Please note that most of the terms in the tracking and management panel have Help descriptions available by clicking on the question mark icon, .
Favorite Star
The yellow star can be clicked on to either make this experiment one of your “favorites” or not. Your favorite experiments are listed first on the Experiments list, making them easier to find.
Application and Experiment Name
The name of the application and experiment.
State
Whether this is a Running, Stopped or Terminated experiment.
Controls
Depending on the state of the experiment, you can use the controls to stop, re-start, terminate or delete this experiment.
Status
Indicates whether or not there is a statistically significant winner among the buckets, which will be indicated by a green checkmark in the left column next to the bucket name.
In the case that more than one bucket is in a statistical tie with one or more other buckets, but are statistically each different from some other “losing” bucket(s), then the bucket(s) will be marked with the green checkmark to show they are “winners”.
Action Rate
The count of the unique users with an action divided by the count of unique users with an impression. E.g. this is usually a click-through rate. If you have defined multiple different action types, the default UI shows only the cumulative action rate (e.g. the numerator is the count of unique users with at least one action of any action type). The individual action rates for each action type are available via the APIs.
Actions
If necessary, you can record more than one action. The details of the action rates and counts for all the actions can be found on the Actions tab.
Improvement
Indicates the improvement (or not) with 95% confidence interval compared to the control bucket. If there is no control bucket specified, then comparisons are made vs. the first bucket in the list.
Rapid Experiment Max Users
As described in the Concepts and Definitions section above, this is a seldom-used feature that allows you to set a maximum number of users to assign to the experiment. The experiment will use whatever other settings are configured for the experiment to determine users to assign to the experiment, but once this configured maximum number of users has been reached, the experiment will be transitioned to the Stopped state, that is, existing assignments will be returned, but no new users will be assigned to the experiment.
Once that has happened, if you need to increase the number of users, edit this setting to increase the number and then start the experiment, again.
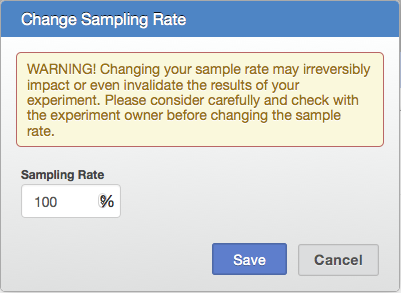
Adjust Sample Rate
Allows you to change your sample rate so you can roll out a winning experience without a code release.
Edit Buckets
You can click on the Edit Buckets link to bring up a dialog to modify the buckets.
NOTE: Editing buckets while an experiment is running or stopped is not advisable. This will make the analytics unreliable and we cannot guarantee a good AB Test result at the end of the experiment. These changes cannot be undone and you should understand the risks before you proceed.
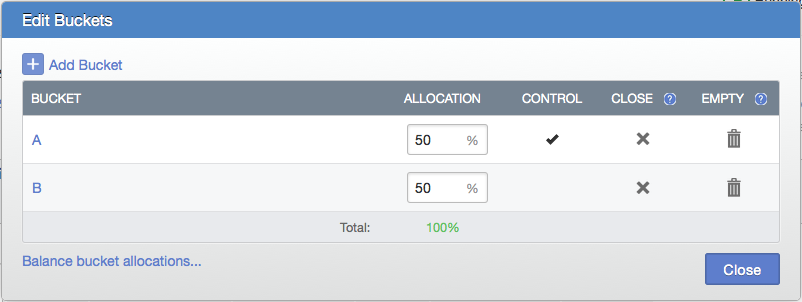
Close Bucket
If you need to stop adding new users to a bucket, but want the existing users to continue receiving their assignments to that bucket, you should close the bucket. When you close a bucket, we set the bucket allocation percentage of the bucket to ZERO and redistribute the allocation percentage of that bucket proportionally among the other remaining buckets. By doing this, we will make sure no new users are put into this bucket. We still retain existing users that are part of this bucket and return assignments for existing users.
Empty Bucket
Empty a bucket (for when there are major experience issues with a bucket – returns all users to the null/“not in experiment” assignment). When you empty a bucket, we set the bucket allocation percentage of the bucket to ZERO and redistribute the allocation percentage of that bucket proportionally among the other remaining buckets. By doing this, we will make sure no new users are put into this bucket. We also make sure all users that are already assigned to this bucket are cleared. They will be given new assignments the next time they come in.
Changing Segmentation, Personalization or Description
There is a set of UI widgets used to edit the Segmentation rule, Personalization settings and Description of a non-Draft experiment (e.g., Running, Stopped, etc.). These widgets allow you to change aspects of the experiment individually and save the changes immediately.
For example, if you edit a Running experiment, you will see the Description field displayed like this:

To edit the description, simply click on the pencil icon in the upper right. That will make the text area editable.

Once you have made your change, click on the green checkmark icon. That will immediately save the new description.
If, instead, you decide that you want to cancel your changes, click on the red X icon. Your changes will be discarded and the previous value will be displayed.
This technique of putting part of the UI into editing mode and allowing the change to be saved or cancelled immediately is also available for the Segmentation and Personalization tabs.
Export Data (Download Assignment Data)
Allows you to export your raw data as a CSV file where each row is an impression or action event for a user.
NOTE: The file downloaded is currently actually a tab-delimited file, not a comma-separated values file. You can import the tab-delimited file into Excel by specifying the delimiter.
Event Payloads
You can include Event payloads in your impression and action event calls. An Event payload is a small JSON payload with your impressions or actions to track other details like query strings, prices paid, etc.
Assignment Override
Allows you to specify the bucket assignment instead of having us provide it – useful for testing and if you have a different system doing the bucket allocation, e.g. an existing AB testing implementation which you want to shadow with our AB Testing service before migrating.
Getting Started with Wasabi
The following steps will help you install the needed tools, then build and run a complete Wasabi stack. Note, at this time, only Mac OS X is supported.
Bootstrap Your Environment
% /usr/bin/ruby \
  -e "$(curl -fsSL https://raw.githubusercontent.com/Homebrew/install/master/install)"
% brew install git
% git clone https://github.com/intuit/wasabi.git
% cd wasabi
% ./bin/wasabi.sh bootstrap
Installed tools include: homebrew 0.9, git 2, maven 3, java 1.8, docker 1.12, node 6 and python 2.7.
Similar tooling will work for Linux and Windows alike. Contribute a patch :)
Start Wasabi
% ./bin/wasabi.sh build start
...
wasabi is operational:

  ui: % open http://localhost:8080     note: sign in as admin/admin
  ping: % curl -i http://localhost:8080/api/v1/ping
  debug: attach to localhost:8180

% curl -i http://localhost:8080/api/v1/ping
HTTP/1.1 200 OK
Date: Wed, 25 May 2016 00:25:47 GMT
...
X-Application-Id: wasabi-api-20151215171929-SNAPSHOT-development
Content-Type: application/json
Transfer-Encoding: chunked
Server: Jetty(9.3.z-SNAPSHOT)

{
  "componentHealths":[
    {
      "componentName":"Experiments Cassandra",
      "healthy":true
    },
    {
      "componentName":"MySql","healthy":true
    }
  ],
  "wasabiVersion":"wasabi-api-20151215171929-SNAPSHOT-development"
}
Now that we have the necessary tools in place let’s move on to build and start Wasabi followed by issuing a ping command to verify the build:
Congratulations! You are the proud owner of a newly minted Wasabi instance. :)
Troubleshoot Wasabi
Look at the current docker containers that have been successfully started.
% ./bin/wasabi.sh status

CONTAINER ID        IMAGE                    COMMAND                  CREATED             STATUS              PORTS                                                                     NAMES
8c12458057ef        wasabi-main              "entrypoint.sh wasabi"   25 minutes ago      Up 25 minutes       0.0.0.0:8080->8080/tcp, 0.0.0.0:8090->8090/tcp, 0.0.0.0:8180->8180/tcp    wasabi-main
979ecc885239        mysql:5.6                "docker-entrypoint.sh"   26 minutes ago      Up 26 minutes       0.0.0.0:3306->3306/tcp                                                    wasabi-mysql
2d33a96abdcb        cassandra:2.1            "/docker-entrypoint.s"   27 minutes ago      Up 27 minutes       7000-7001/tcp, 0.0.0.0:9042->9042/tcp, 7199/tcp, 0.0.0.0:9160->9160/tcp   wasabi-cassandra
- While starting Wasabi, if you see an error when the docker containers are starting up, you could do the following:
E.g. if Cassandra and Wasabi containers have not started, then start them individually:
% ./bin/wasabi.sh start:cassandra

% ./bin/wasabi.sh start:wasabi
- The above shell output shows a successful start of 3 docker containers needed by Wasabi: wasabi-main (the Wasabi server), wasabi-mysql, and wasabi-cassandra. If any of these are not running, try starting them individually. For example, if the MySQL container is running, but Cassandra and Wasabi containers failed to start (perhaps due to a network timeout docker could not download the Cassandra image), do the following:
Call Wasabi
These are the 3 common REST endpoints that you will use to instrument your client application with Wasabi.
Let’s assume that you’ve created and started an experiment, ‘BuyButton,’ in the 'Demo_App’ application with the following buckets:
- 'BucketA’: green button (control bucket)
- 'BucketB’: orange button bucket
Assign a user to experiment and bucket:
% curl -H "Content-Type: application/json" \
    http://localhost:8080/api/v1/assignments/applications/Demo_App/experiments/BuyButton/users/userID1

{
   "cache":true,
   "payload":"green",
   "assignment":"BucketA",
   "context":"PROD",
   "status":"NEW_ASSIGNMENT"
}
You can assign a user with a unique ID (e.g. 'userID1’) to the experiment by making this HTTP request:
Record an impression:
% curl -H "Content-Type: application/json" \
    -d "{\"events\":[{\"name\":\"IMPRESSION\"}]}" \
    http://localhost:8080/api/v1/events/applications/Demo_App/experiments/BuyButton/users/userID1
Now the 'userID1’ user is assigned into the 'BucketA’ bucket. Let’s further record an impression, meaning the user has seen a given experience:
Record an action:
% curl -H "Content-Type: application/json" \
    -d "{\"events\":[{\"name\":\"BuyClicked\"}]}" \
    http://localhost:8080/api/v1/events/applications/Demo_App/experiments/BuyButton/users/userID1
If the 'userID1’ user performs an action such as clicking the Buy button, you’d record that action with the following request:
Developer Resources
API: Swagger API playground
% ./bin/wasabi.sh resource:api
Javadoc
% ./bin/wasabi.sh resource:doc
Wasabi UI
% ./bin/wasabi.sh resource:ui
Cassandra: cqlsh shell
% ./bin/wasabi.sh resource:cassandra
MySQL: mysql shell
% ./bin/wasabi.sh resource:mysql
Java Debugger: Remote attach configuration
-agentlib:jdwp=transport=dt_socket,server=y,suspend=n,address=8180
Stop Wasabi
% ./bin/wasabi.sh stop
Alas, all good things must come to an end. Let’s clean things up a bit stop the newly created Wasabi stack:
At this point in time, we now have all the requisite tools installed, and subsequent invocations of Wasabi will start up much more quickly.
Get Familiar with wasabi.sh
% ./bin/wasabi.sh --help

  usage: wasabi.sh [options] [commands]

  options:
    -e | --endpoint [ host:port ]          : api endpoint; default: localhost:8080
    -v | --verify [ true | false ]         : verify installation configuration; default: false
    -s | --sleep [ sleep-time ]            : sleep/wait time in seconds; default: 30
    -h | --help                            : help message

  commands:
    bootstrap                              : install dependencies
    build                                  : build project
    start[:cassandra,mysql,wasabi]         : start all, cassandra, mysql, wasabi
    test                                   : test wasabi
    stop[:wasabi,cassandra,mysql]          : stop all, wasabi, cassandra, mysql
    resource[:ui,api,doc,cassandra,mysql]  : open resource api, javadoc, cassandra, mysql
    status                                 : display resource status
    remove[:wasabi,cassandra,mysql]        : remove all, wasabi, cassandra, mysql
    package                                : build deployable packages
    release[:start,finish]                 : promote release
Further, there are a number of additional wasabi.sh options available you should become familiar with:
Develop Wasabi
Build and Run Wasabi Server
% mvn package
% ./bin/wasabi.sh start:cassandra,mysql
% (cd modules/main/target; \
    WASABI_CONFIGURATION="-DnodeHosts=localhost -Ddatabase.url.host=localhost" ./wasabi-main-*-SNAPSHOT-development/bin/run) &
% curl -i http://localhost:8080/api/v1/ping
...
Viewing runtime logs:
% tail -f modules/main/target/wasabi-main-*-SNAPSHOT-development/logs/wasabi-main-*-SNAPSHOT-development.log
The runtime logs can be accessed executing the following command in a another shell:
Build and Run Wasabi UI
% cd modules/ui
% grunt build
Edit Gruntfile.js with the following change to the apiHostBaseUrlValue value, since you would be running the Wasabi server on localhost.
development: {
  constants: {
    supportEmail: 'you@example.com',
    apiHostBaseUrlValue: 'http://localhost:8080/api/v1'
  }
}
% grunt serve
Stop Wasabi
% ./bin/wasabi.sh stop
Wasabi runtime configuration:
-DnodeHosts=localhost -Ddatabase.url.host=localhost
Now while that was fun, in all likelihood you will be using an IDE to work on Wasabi. In doing so, you need only add the configuration information above to the JVM commandline prior to startup:
Run Integration Tests
% ./bin/wasabi.sh start test stop
Code changes can readily be verified by running the growing collection of included integration tests:
Package and Deploy at Scale
% ./bin/wasabi.sh package
% find ./modules -type f \( -name "*.rpm" -or -name "*.deb" \)
Wasabi can readily be packaged as installable rpm or deb distributions and deployed at scale as follows:
Note: Java 8 is a runtime dependency
Integrate Wasabi
<dependency>
    <groupId>com.intuit.wasabi</groupId>
    <artifactId>wasabi</artifactId>
    <version>1.0.20160627213750<build_timestamp></version>
</dependency>
Wasabi is readily embeddable via the following maven dependency GAV family:
Contribute
We greatly encourage contributions! You can add new features, report and fix existing bugs, write docs and tutorials, or any of the above. Feel free to open issues and/or send pull requests.
The master branch of this repository contains the latest stable release of Wasabi, while snapshots are published to the develop branch. In general, pull requests should be submitted against develop by forking this repo into your account, developing and testing your changes, and creating pull requests to request merges. See the Contributing to a Project
article for more details about how to contribute.
Extension projects such as browser plugins, client integration libraries, and apps can be contributed under the contrib directory.
Steps to contribute:
- Fork this repository into your account on Github
- Clone your forked repository (not our original one) to your hard drive with
git clone https://github.com/YOURUSERNAME/wasabi.git - Design and develop your changes
- Add/update unit tests
- Add/update integration tests
- Add/update documentation on
gh-pagesbranch - Create a pull request for review to request merge
- Obtain 2 approval squirrels before your changes can be merged
Thank you for you contribution!
Recap
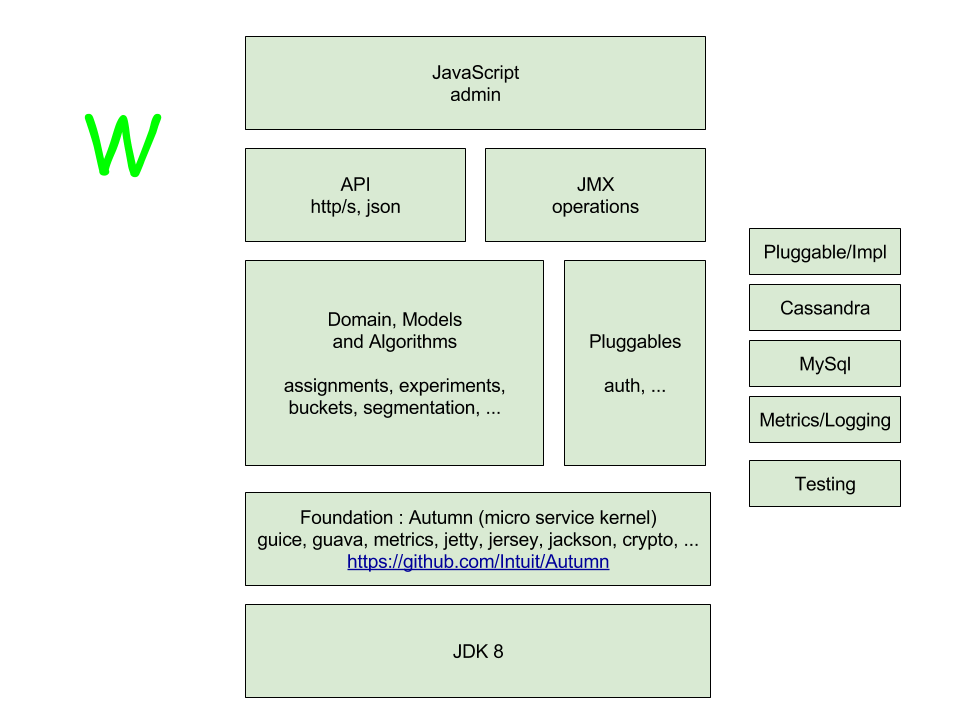
Ok, that was a ground to cover. Here is a high level overview of the operational elements described above, either directly or indirectly:
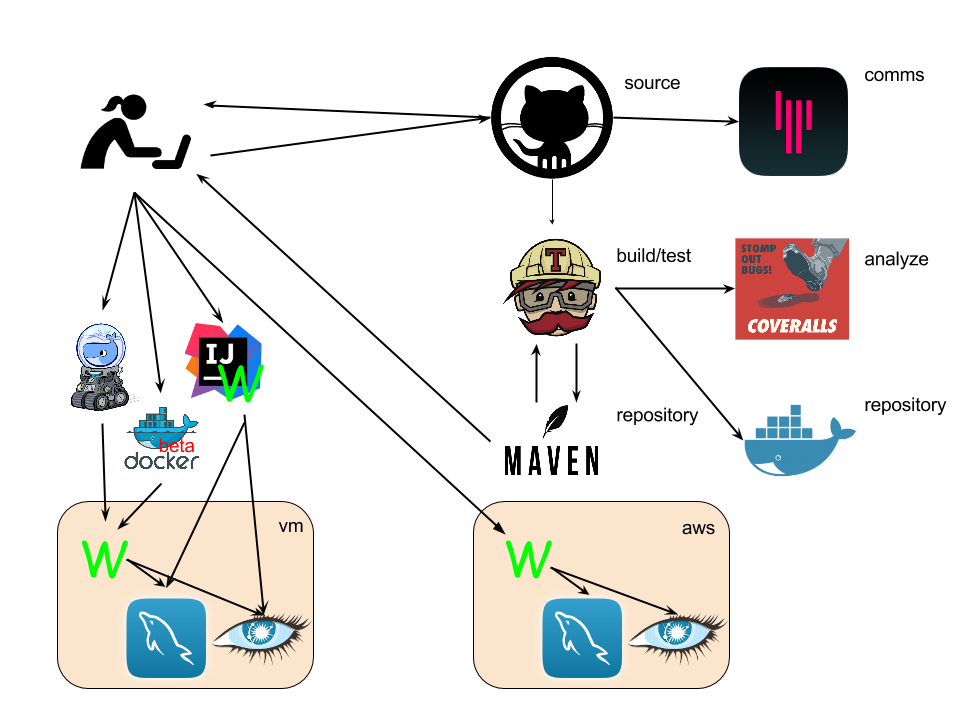
And lastly, here is a technology stack diagram of the elements of which a Wasabi instance is comprised of:
Hello World: Client Demo App
Navigate to the client-demo project
The ‘client-demo’ project is located under the 'contrib’ directory.
% cd contrib/client-demo
Setup an experiment
Note: make sure your Wasabi service is running (default: localhost:8080)
% ./bin/setup.sh create
Create and start a 'BuyButton’ experiment under 'Demo_App’ application with 2 buckets:
- 'BucketA’: green button, control bucket
- 'BucketB’: orange button bucket
Note the experimentUUID if you want to remove it later.
Launch your client app
% open index.html
Launch the client demo app and simulate a user getting into an experiment (assignment), seeing an experience (impression), and clicking a button (action).
Track experiment results
% open http://localhost:8080
## note: sign in as admin/admin
Launch the Admin UI, navigate to the 'BuyButton’ experiment.
Watch assignment, impression, and action counts increment with users going through the client demo app.
You’ll see which buckets are trending as users go through the buckets.
Remove the sample experiment
% ./bin/setup.sh remove:<experimentUUID>
Integrating AB Testing in your product
With our service, integrating AB testing in your product is as simple as an API call. Really. It’s that simple. Let’s look at the detailed steps involved.
Step - 1
Create Experiment in the UI. Click on the “Create Experiment” button.
Step - 2
Enter the Experiment name (for example: tto_getdata_autoimport_test), select the Application name (for example: CTG, SBG, CG, etc..), enter the Sampling percentage (What % of users do you want to send to this experiment? This ranges from 0.01% to 100%. 100% means all traffic will be sent to this experiment), Start date (when do you want this experiment to start collecting data and assign users to buckets) and end date (When do you want this experiment to stop collecting data and assigning users to buckets) and a brief description that describes what the experiment is about. Note that you will probably not want to enter a value for the Rapid Experiment Max Users as that is a feature only a few teams use. Read the help about the feature by clicking on the question mark icon if you are interested.
Step - 3
Click on the “Create Experiment” button.
Step - 4
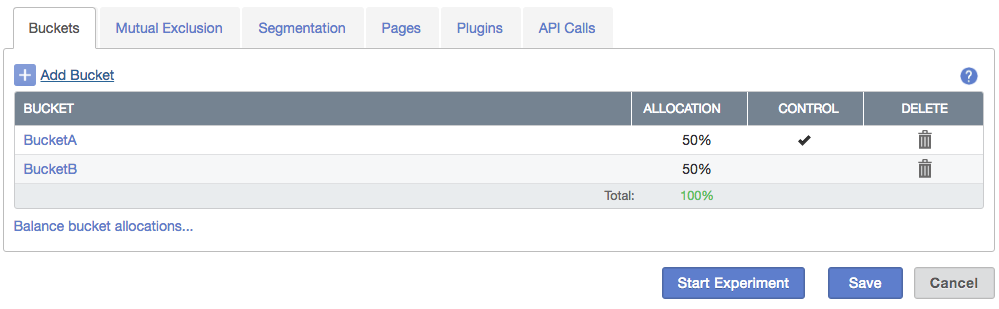
Once you finish step 3, you will now start creating buckets (recipes) for your experiment. Ideally, for AB Testing there is a control bucket and other buckets that serve as alternatives to control. We’ll go ahead and define those now in the UI. Click on “Add Bucket” link in the UI under the “Buckets” tab.

Step - 5a
Enter the Bucket name, Allocation percentage (this is the percentage of people from the sampling percentage that you entered in step 2 of creating the experiment. For example: When I enter 50% here, it means that of all users entering the experiment 50% will see this version) and a brief description of what the bucket is. Also, make sure you check the “Control” check box if this is the control (Typically bucket A or recipe A. You can come up with whatever name you like).
Step - 5b
Follow the steps in 5a to create another bucket. We now have 2 buckets.
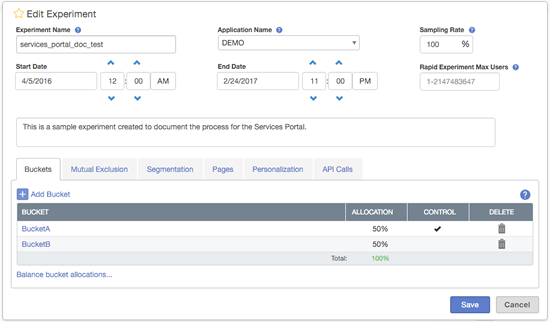
You are now ready to start running the experiment. However, there are some advanced features that we will go into. If you don’t need to know these advanced features, feel free to jump right into the code section to see how you can integrate AB testing in your code.
Step - 6
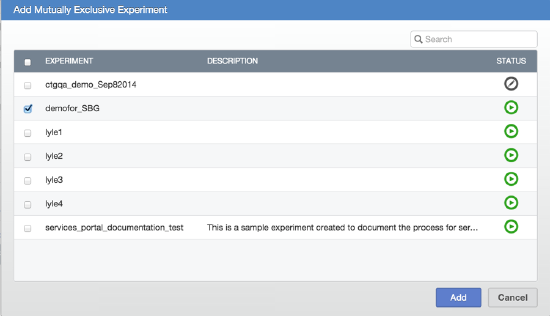
Setup Mutual Exclusion rules by clicking on the Mutual Exclusion tab. Here you can select all other experiments running in your current app which are mutually exclusive. Wasabi will look at the selection and makes sure that the same user is not put into mutually exclusive buckets. Click the “Add experiments” link to start picking experiments.
Be sure to read the discussion of Experiment Priorities below, as those only apply when you have chosen to make experiments mutually exclusive with each other.
Step - 7
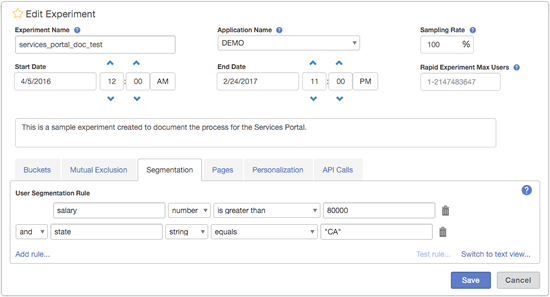
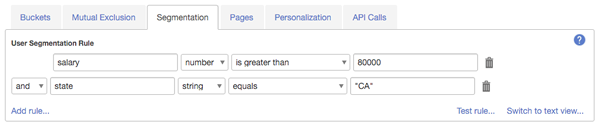
You can give some targeting rules for these experiments. You can choose which segment of users will see this experiment. If you want to target your experiment to a set of users that qualify certain criteria, you can define the criteria here. For example, for my experiment I want to target users whose salary is greater than $80,000 and who live in California, my segmentation rule would be: salary > 80000 & state =“CA”.

By default, you should see the “form view” for entering and editing a rule. This allows you to enter and edit segmentation rules without having to know the expression syntax. So, for example, to enter the rule mentioned above, you would first enter “salary” in the “Parameter name” field, then select “number” from the drop down. When you do that, the selections in the next drop down will be valid choices for number type expressions (“equals”, “does not equal”, “is greater than”, “is less than”, “is greater than or equal to”, or “is less than or equal to”). Select “is greater than”. Finally, the value to test against, 80000, is entered in the final field.
Since we need another rule, “state = CA”, we click on “Add rule…”. This adds another row of widgets, including one that allows you to select “and” or “or” to the left of the second row. We want to “and” the rule segments, so we leave the default choice of “and” for the first drop down menu. We enter “state” for the “Parameter name”, select “string” for the type, select “equals” for the comparison operator, and then enter “CA” for the comparison value. Note that you actually need to enter the quotes for the “CA” (the placeholder text gives you a hint for each type of value).
Your segmentation rule tab should now look like this:
After you save the dialog, you can edit the experiment again (by clicking on the name of the experiment in the Experiments list). If you then go back to the Segmentation tab, you will see the “Test rule…” link is enabled. By clicking on that, you will get a dialog that is created from the rule and allows you to enter values and then test whether the rule will be “passed” or “failed” given those values. Here is an example of that dialog:

You can also look at the rule syntax in text form by clicking on the “Switch to text view…” link.
Note that the call to assign a user to an experiment that has a segmentation rule is different from the call to assign a user to an experiment that does not have one. That is because in order for the rule to be run successfully, you need to pass values for the parameters to the rule in the assignment call. The values you pass should be for the user you are assigning. For examples of the syntax used when passing the rule values, see the API Calls tab for the experiment.
Step - 8
(Entirely Optional) You can add a “Page” to your experiment. This like a tag that you use to identify a group of experiments. A “Page” can be shared with more than one experiment. This is particularly helpful when you want to allow assignment calls for a group of experiments. Without pages you would call assignments on each experiment manually. But with pages, you would call the page assignment API and all experiments that this page refers to will get the assignment call. In the screenshot below, I gave a page name as “checkout_page”. The reason for that is this experiment is running on my checkout page. There are other experiments running on this page, too, so I will need to add this page name to them.
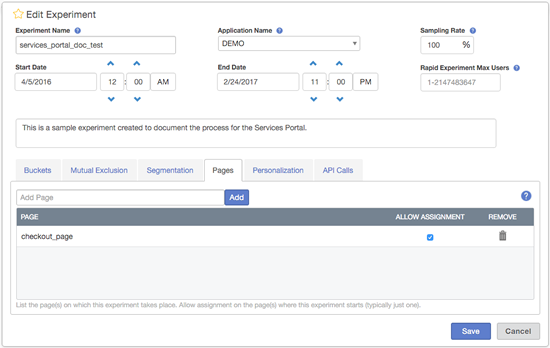
See the API Calls tab for examples of the API used when you are assigning a user to multiple experiments using “pages” in one call.
Step - 9
Save the experiment by clicking on the “Save” button.
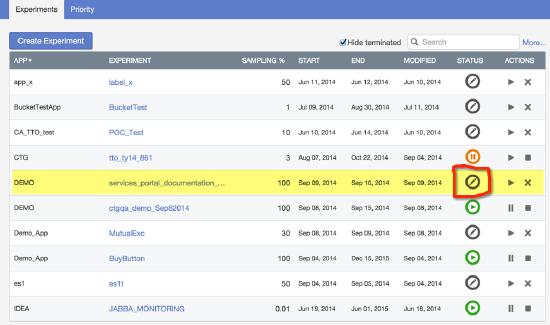
Step - 10
You will find the experiment listed on the homepage. As you will notice, this is still in a draft state. You have to manually click the “Play” button next to it to start the experiment. Go ahead and hit Play.
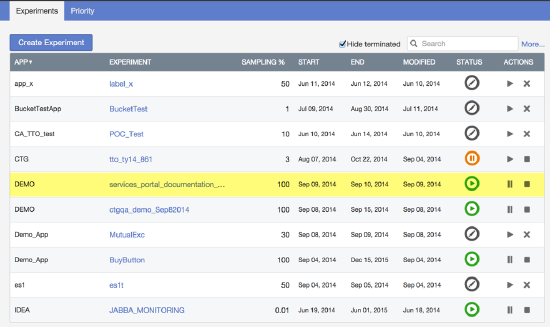
Step - 11
The status changes to the green Play icon indicating that the experiment is running. But the experiment won’t perform assignments and collect data until the start date.
Advanced topics
Experiment priority
In setting up an experiment, there are eligibility rules associated with each experiment. Some experiments have rules which are fairly easy to satisfy (e.g. mobile users only), while others have much more stringent rules (e.g. mobile users between the age of 25-39 in states with no income tax and who have previously used TurboTax). Those experiments with more stringent rules will oftentimes have an issue with getting enough users in the experiments for it to reach the desired level of statistical confidence. We want to allow the user a way to manage their experiments such that these experiments with more stringent eligibility rules will still be able to acquire enough users to produce meaningful results.
In order to support this use case, the AB Testing service allows you to specify a priority order that will be used with mutually exclusive experiments to determine which should be checked, first, when deciding to assign a user to the experiments.
To set up your priority order, you use the Priority UI. In the Priority UI, you can change the priority in two ways:
Just type in the number you want in the priority box and the list will re-arrange according to the new priority. Manually drag the row you want to the desired priority location and the priority numbers will be updated automatically. Priority rankings are only relevant when used in conjunction with mutual exclusion and with the pages feature. That is because you must be trying to assign a user to multiple mutually exclusive experiments before the priority of the experiments relative to each other is relevant. By using these features, you can achieve efficient user assignment management.
priority.png
Notice the “Edit Sampling %” button. If you want, you can click on that button and the sampling percentage for all the experiments in the list will become editable. This is an easy to adjust the percentages of a group of related experiments.
Also notice that if you click on one of the experiments, the other experiments in the list that are mutually exclusive with that experiment will be highlighted.
Now that we have created the experiment in the UI, the next step is to integrate this in your code. Let’s take a look at how this works. Below is a very simple example on how to integrate AB Testing in your code.
Code Samples
JavaScript
    //Configuration
    var server = "abtesting-demo-e2e.a.intuit.com";
    var appName = "Demo_App";
    var expLabel = "BuyButton";
    var buckets = [ "BucketA", "BucketB" ];
    var colors = [ 'DarkSeaGreen', 'Peru' ];

    // Experiment related Information
    var userID;
    var experimentID;
    var bucket;
    ...

    userID = escape($('#userIDext').val());

    var assignmentCall = $.ajax({
        url: "http://"+ server
            + "/api/v1/assignments/applications/"
            + appName
            + "/experiments/"
            + expLabel
            + "/users/"
            + userID,
        dataType: 'json',
        timeout: 300,
        success: function(data) {
            response = JSON.parse(data);
            bucket = data.assignment;
        }
    });
Here is a very simple implementation of AB testing in your code. This app displays either a “Green” or “Orange” buy button depending on the user. I created two buckets in my experiment with a sampling rate of 50% each. Each time a user logs in, the app makes an API call to AB testing and provides the application name, experiment label and user ID of the current user in the app. A user ID could be anything that you internally use to uniquely identify a user in your system. Sometimes, it could be a visitor ID for marketing pages.
In the above code snippet, as soon as the app gets the user ID, it makes a simple ajax call to the assignments API provided by the AB Testing service. AB Testing service will evaluate the request and return the bucket the user belongs to. It could be one of the buckets that you created during your experiment setup or “null” indicating that this particular user does not qualify for the experiment (if the Sampling Percentage of the experiment is less than 100%).
Best Practice: As you noticed I set a timeout of 300 milliseconds on the ajax call. The reason for this is to make sure your users get an uninterrupted experience. We make sure we maintain at least 45 ms response time for all of our APIs, but that doesn’t include network latency, etc. It is your responsibility to prepare for the unexpected and provide a seamless user experience, so you might want to experiment to find the right timeout for your situation. You obviously don’t want your users to see a spinning mouse on their browsers for an hour, do you?
Now that we have our bucket assignment from AB Testing service, the application then decides what experience to show to the user depending on what bucket the user falls into.
Logging impressions and actions:
In order for the AB Testing service to determine which bucket is the winner, it needs to know how many users actually saw the experience and if the users took any actions on that experience. Impressions are similar to page views and actions are button clicks, hovers, right clicks, checkouts, or whatever metric you want to measure.
The following are the API calls that you would call from your code just like how you called the assignments API to tell the AB Testing service about impressions and actions. This information helps the service determine a winner. These are just example calls using the “curl” command, but you can translate them to whatever language your application is using.
Log an impression
curl -v -H 'Content-type: application/json' -d '{"events":[{"name":"IMPRESSION"}]}' http://abtesting-demo-e2e.a.intuit.com/api/v1/events/applications/$appName/experiments/$experimentName/users/$userId
Log an action
curl -H 'Content-type: application/json' -d '{"events":[{"name":$actionName}]}' http://abtesting-demo-e2e.a.intuit.com/api/v1/events/applications/$appName/experiments/$experimentName/users/$userId
Forming a Segmentation Rule
The Segmentation Rule feature of the AB Testing server allows the experiment owner to target an AB Test to a specific user group that fall into a certain category. For example, if you want to target an AB Test only to the people whose salary is greater than $80000 and who live in California, the rule would say salary > 80000 & state = “CA”.
How do I form the rules?
Creating rules is simple. Here are some instructions that will help you understand.
The easiest way to create a rule (unless it is a very large rule) is using the Rule Creation UI. This is the default UI you see when you edit an experiment and go to the Segmentation tab:
By default, you should see the “form view” for entering and editing a rule. This allows you to enter and edit segmentation rules without having to know the expression syntax. (If you don’t see the fields and menus shown above in the Segmentation tab, click on the “Switch to form view…” link on the bottom right.)
So, for example, to enter the rule mentioned above, you would first enter “salary” in the “Parameter name” field, then select “number” from the drop down. When you do that, the selections in the next drop down will be valid choices for number type expressions (“equals”, “does not equal”, “is greater than”, “is less than”, “is greater than or equal to”, or “is less than or equal to”). Select “is greater than”. Finally, the value to test against, 80000, is entered in the final field.
Since we need another rule, “state = CA”, we click on “Add rule…”. This adds another row of widgets, including one that allows you to select “and” or “or” to the left of the second row. We want to “and” the rule segments, so we leave the default choice of “and” for the first drop down menu. We enter “state” for the “Parameter name”, select “string” for the type, select “equals” for the comparison operator, and then enter “CA” for the comparison value. Note that you actually need to enter the quotes for the “CA” (the placeholder text gives you a hint for each type of value).
Your segmentation rule tab should now look like this:
If you now save your experiment and then edit it again, you can use the “Test rule…” feature. This is only enabled after you have saved the segmentation rule because the testing feature actually hits the AB Testing service and uses the same code that is used when your application calls to assign a user to the experiment. When you click on that link, you’ll get the following dialog:
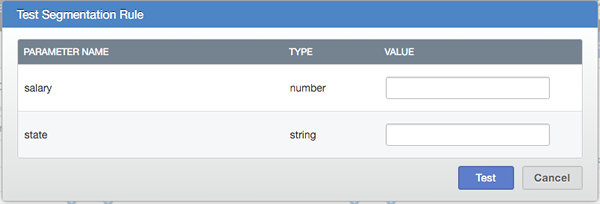
Notice that this dialog is created from the rule, e.g., there is a field for a value for “salary” and one for a value for “state”. You put example values in those fields like what you will be passing for each user and then you can see if, given those values, the rule would pass or fail.
What type of comparisons can I have in my rules?
We support a variety of comparison “operators” that can be used to create the rule. These are what you use to compare the values you pass in for each user with the value being tested against in the rule.
For Strings
| meaning | operator | note |
|---|---|---|
| equals | = | this operator ignores upper and lower case |
| does not equal | != | this operator ignores upper and lower case |
| equals (same case) | ^= | exact matching including upper and lower case |
| matches (regexp) | =~ | using Java regex syntax* |
| does not match (regexp) | !~ | using Java regex syntax* |
- more specifically, left =~ right is equivalent to the following Java statement: Pattern.matches(right, left) (see here for more documentation).
Examples for String rules:
name = "wasabi"
name != "wasabi"
name =~ "(.*)srikanth(.*)" //This matches all Strings that contain the word Srikanth. The left hand side is the key and
the right hand side is the RegEx pattern. The RegEx is standard Java RegEx.
name !~ "(.*)srikanth(.*)"
For numerical values:
| meaning | operator |
|---|---|
| equals | = |
| does not equal | != |
| greater than | > |
| greater than or equal to | >= |
| less than | < |
| less than equal to | <= |
For boolean values:
| meaning | operator |
|---|---|
| is | = |
| is not | != |
For date values:
| meaning | operator | note |
|---|---|---|
| is on, equals | = | dates that exactly match (down to the millisecond) |
| is before | < | left date is before right date |
| is after | > | left date is after right date |
| is not on, does not equal | != | negation of on |
The symbols in brackets are the representations of the operators in the logical expression language, referred to in the UI as the “text view” of the rule. Operators can compare any combination of attributes and constants, so both a comparison of attributes to constants as well as comparing two different attributes is possible (although that is not supported by the form view in the UI).
Conditions can be combined using boolean operators: and (&), or (|), not (!): NOTE: This is not available through the “form view” in the UI.
What is the Logical Expression Language
NOTE: If you can fit your rules into the form view of the UI, you should do so, as it is a much simpler and more reliable way to create and edit rules. There are some features in the string form of the rules that you can create using the text view that are not supported in the form view. If you choose to use some of these, by using them in the text view, you will not be able to switch to the form view. Examples of features you can’t use in the form view are parentheses and the Boolean “not” operator.
If you choose to use the form view, you don’t need to read the rest of this section.
The Logical Expression Language is what you use to write rules. It is proprietary but very simple and straightforward. Here is some helpful information below.
Valid elements in this language are:
- string literals (delimited by either a pair of “ or ’)
- boolean literals (true or false ignoring case)
- number literals (Java standard notation rules: sequence of digits 0-9, point optional for fractions)
date literals as specified here within ” or ’. Valid date literals:
yyyy-MM-ddyyyy-MM-dd'T'HH:mm:ss(NB: this specifies the instant associated with this time in your local time zone)attribute identifiers (any valid variable identifier in Java)
relational operators (as described above)
logical operators (and, or, not or &, |, !)
Then a condition is defined as follows:
condition := (attribute | literal) operator (attribute | literal)
Additional restrictions apply in that the types associated with the attribute/literal/operator in the condition have to match.
Examples of valid conditions are:
income > 10000
income > adjusted_income
10000 < income
!(age > 65) // the brackets are not necessary but improve readability
state = "california"
Conditions can be chained by logical operators to create a rule, with parentheses determining precedence. Formally, valid rules are defined as follows:
rule := condition | (rule) | !rule | (rule || rule) | (rule && rule)
These can be combined to an expression:
income > 10000 & !(age > 65) | state = "california"
Expressions are evaluated from left to right, i.e. there is an implicit left-to-right bracketing. That is, the above expression is equivalent to:
(income > 10000 & !(age > 65)) | state = "california"
Parentheses can be freely inserted around binary logical operators to change the order of evaluation, creating a different expression:
income > 10000 & (!(age > 65) | state = "california"
Developing Wasabi
Using Wasabi's Codestyle
Wasabi comes with a codestyle setting for both IntelliJ and Eclipse. They can be found in the bin directory and easily imported to your IDE. When writing new code those should be used to align your addition with the rest of the codebase.
Extending Server-side Modules
Wasabi uses Guice heavily for dependency injection. In order to extend the functionality, you will have to implement the appropriate interfaces below, and optionally, extend the corresponding module class to bind objects to your implementation.
Authentication
- Interface:
com.intuit.idea.abntest.authentication.Authentication
By implementing this interface, you can include your own authentication scheme. Be sure to update the
<authentication.class.name> property in the root pom.xml file with your appropriate class.
The default implementation for the Authentication interface is
com.intuit.idea.abntest.authentication.impl.DefaultAuthentication. It reads user credentials from the
userDirectory.properties file.
Authorization
- Interface:
com.intuit.idea.abntest.authorization.Authorization
Implement this interface to include your own authorization scheme. Be sure to update the <authorization.class.name>
property in the root pom.xml file with your appropriate class.
If you extended the com.intuit.idea.abntest.authentication.AuthenticationModule Guice module with your own
implementation, then you must extend the com.intuit.idea.abntest.authorization.AuthorizationModule Guice module as
well in order to install your appropriate authenticaton module.
By implementing this interface, you can include your own authorization scheme. Be sure to update the
<authorization.class.name> property in the root pom.xml file with your appropriate class.
Real-Time Data Exportation
Wasabi allows for the exportation of data in real-time as events occur. Two types of data types can are exported: assignment data, and impression/action data.
Assignment data
Whenever an assignment data object is created/modified, you can export that event in the following way:
- Create a class that implements the AssignmentIngestionExecutor interface, and will execute when an AssignmentEnvelopePayload object is received:
package com.mypackage;

import com.intuit.idea.abntest.assignment.AssignmentIngestionExecutor;
import com.intuit.idea.abntest.assignmentobjects.AssignmentEnvelopePayload;

/**
 * MyIngestionExecutor
 */
public class MyIngestionExecutor implements AssignmentIngestionExecutor {

    public static final String NAME = "MYINGESTOR";

    // Override the methods below appropriately

    @Override
    public void execute(AssignmentEnvelopePayload assignmentEnvelopePayload) {
    }

    @Override
    public int queueLength() {
        return 0;
    }

    @Override
    public String name() {
        return null;
    }
}
- Extend the AssignmentsModule class to create a thread pool and bind your IngestmentExecutor class:
package com.mypackage;

import com.google.common.util.concurrent.ThreadFactoryBuilder;

import java.util.concurrent.LinkedBlockingQueue;
import java.util.concurrent.ThreadPoolExecutor;

import static com.google.inject.name.Names.named;
import static java.util.concurrent.TimeUnit.MILLISECONDS;

/**
 * Created by tislam1 on 6/21/16.
 */
public class MyAssignmentsModule extends AssignmentsModule {

    @Override
    protected void configure() {
        super.configure();

        // bind the threadpool executor to your ingestor's threadpool
        bindMyIngestionThreadPool();

        // add your IngestionExecutor's class to the mapBinder
        mapBinder.addBinding(MyIngestionExecutor.NAME).to(MyIngestionExecutor.class);
    }

    private void bindMyIngestionThreadPool() {
        // create an in-memory queue
        LinkedBlockingQueue<Runnable> myQueue = new LinkedBlockingQueue<>();
        // set your threadpool size
        int myThreadPoolSize = 5;
        ThreadPoolExecutor myThreadPoolExecutor = new ThreadPoolExecutor(myThreadPoolSize,
                myThreadPoolSize, 0L, MILLISECONDS, myQueue, new ThreadFactoryBuilder()
                .setNameFormat("MyIngestion-%d")
                .setDaemon(true)
                .build());
        bind(ThreadPoolExecutor.class).annotatedWith(named("my.assignmentThreadPoolExecutor")).toInstance(myThreadPoolExecutor);
    }
}
- Modify the EventsModule class’s configure() method to install the MyAssignmentsModule class.
Impressions/Actions data
- Interface:
Extending the UI Plugin Mechanism
Overview Code/Template Plugin Mechanism Configuration Mechanism Branding Mechanism Appendix
Overview
In order to create a version of the Wasabi UI that we could Open Source, we removed several features that we felt either didn’t make sense to be open sourced or couldn’t be. However, when we create a version of Wasabi that is for Intuit use, we want to put those features back (or most of them). In order to handle that in as general a manner as possible, we created several mechanisms that would have no effect on the UI unless activated by some configuration. The generic open source version would then not have the features or branding, but by putting some configuration in place, the Intuit version would. That also makes the plugin capability a feature that could be used by other adopters of our open source version.
This document describes the plugin mechanisms and the changes that would need to be made to put the Intuit features back in.
Code/Template Plugin Mechanism
Motivation
One of the features we took out and wanted to put back in was a feature in the UI that allowed the user to configure the Personalization feature. This is basically a reference to a service that Wasabi will turn around and call to make decisions about bucketing, that is, rather than using our usual rules of using the bucket allocation percentages to determine whether a user is in one bucket or another, the service can use whatever criteria it wants to make that decision.
The UI allowed the user to turn Personalization on or off (“make this a personalization experiment”) and if on, to configure the name of the model (the service) and a version number of the model. These features in the UI were presented in one of the tabs on the Draft experiment dialog and on the Running experiment dialog (different implementations).
Implementation
In order to support putting that feature back in, we added a tab called Plugins in the Draft and Running dialogs. We then added the ability to specify, through configuration, a template for the UI of each of the features to be added as well as the controller code for the feature. When a feature is configured for the Draft dialog, for example, a button is created in the Plugins tab. If the user clicks on that button, a dialog appears and shows the template, using the configured controller.
Use
var wasabiUIPlugins = [
    {
        "pluginType": "contributeDraftTab",
        "displayName": "Personalization",
        "ctrlName": "PersonalizationCtrl",
        "ctrl": "plugins/personalization/ctrl.js",
        "templateUrl": "plugins/personalization/template.html"
    },
    {
        "pluginType": "contributeDetailsTab",
        "displayName": "Personalization",
        "ctrlName": "PersonalizationDetailsCtrl",
        "ctrl": "plugins/personalization/detailsCtrl.js",
        "templateUrl": "plugins/personalization/detailsTemplate.html"
    }
];
In order to contribute a plugin to one of the dialogs (Draft or Running), you need to add some configuration to the file modules/ui/app/scripts/plugins.js . The configuration looks like this:
This file exists in vanilla open source Wasabi, but it simply contains an empty array.
The configuration above defines two plugins. The first contributes a plugin to the dialog for editing a Draft experiment. The second contributes a plugin to the dialog for editing Running experiments. In both cases, the Plugins tab will have a button with the label “Personalization” (the “displayName”). The last piece of configuration defines the name of the controller created by the code referenced by the “ctrl” parameter. Of course, in order for this configuration to work, the files must exist beneath the modules/ui/app/scripts/plugins directory.
Note that we have also used this mechanism to implement the plugging in of click tracking in the Wasabi UI itself. We needed to remove that because we use our WebSDK to Trinity and that isn’t externally visible. This consists of creating an object that has 3 methods, init(), reset() and trackEvent(eventName, parm1, parm2, parm3, parm4). In conjunction with the WebSDK, we also added a plugin configuration that is mainly there just to load the WebSDK library. Here is the configuration:
    {
        "pluginType": "contributeClickTrackingLib",
        "ctrl": "https://dwum8argi892z.cloudfront.net/js/cdc_lib_min_latest.js"
    },
    {
        "pluginType": "contributeClickTracking",
        "displayName": "",
        "ctrlName": "TrackingFactory",
        "ctrl": "plugins/tracking/factory.js",
        "templateUrl": ""
    }
By simply configuring a plugin of a type that isn’t used anywhere, but registering the WebSDK library as the “ctrl”, the file will be loaded when the plugins are loaded. Then the “contributeClickTracking” will be loaded, which will create an object that is called by the generic code in UtilitiesFactory and app.js.
If you look at the code, notice that there needed to be some code to handle the fact that, while we start the loading of the WebSDK (the cdc_lib_min_latest.js file above) first, it may not have loaded by the time the TrackingFactory code is called, so we need to handle that with some setTimeouts.
See the appendix for an example of the code and templates.
Technical Details
In order to implement this, we needed to load the controller code dynamically from the configuration at the time the app is loaded into the browser. This is done by the code that creates the Angular JS app for the UI in modules/ui/app/scripts/app.js . The plugins.js file is referenced by index.html and so that JavaScript object (an array of objects) will be loaded. But then we iterate over the array and save the configuration in a global array (in $rootScope) and then use the UtilitiesFactory.loadExternalFile() method to cause the browser to pull the controller code in and load the object.
Now, when each of the dialogs is created, the $rootScope.plugins array is available to the controller and is used to create whatever buttons are necessary on the Plugins tab. When the user clicks on the button, the openPluginModal() method is called. That method displays a modal dialog using the configured template and controller code, hence presenting the plugin and allowing it to implement its own UI.
Configuration Mechanism
Motivation
Several of the things we needed configurable didn’t need to be as complex as a plugin. One of them was an error message that displayed our support email as part of the message. Obviously, we didn’t want our support email in the open source version, but we wanted to be able to put it back for the Intuit version.
Implementation
Since this involved a simple, configurable piece of text, we implemented it by pulling in a grunt plugin called grunt-ng-constant (or ngconstant). This plugin allows you to configure values that will be placed in a generated Angular JS module. That file is included by index.html, causing the module to be instantiated, and then the module just has to be injected into the other parts of your Angular JS app.
We configured ngconstant to run in the grunt build and generate a file named modules/ui/app/scripts/config.js from an input file at modules/ui/constants.json . The config.js file contains the configured values, including “supportEmail”, in a module definition. That value is injected into the ExperimentDetailsCtrl and used in an error message, if it exists.
At the same time, we changed the configuration of the URL of the backend server to be also defined using the ngconstant mechanism.
Use
{
    "supportEmail": "",
    "apiHostBaseUrlValue": "http://localhost:8080/api/v1"
}
In order to configure a support email for Wasabi, you simply edit the modules/ui/constants.json file which looks like this by default:
{
  "supportEmail": "abtesting.support@intuit.com",
  "apiHostBaseUrlValue": "http://localhost:8080/api/v1"
}
This will cause no support email to be displayed in the error message. If, instead, it looked like this:
Then the support email will be displayed in that error message.
Technical Details
One thing of note, in order to make it possible to be able to customize the backend server URL after the build (e.g., during deployment), we needed to make sure the config.js file was not minimized into the wasabi.js file during the grunt build. We also needed to make sure it was loaded by the index.html .
In order to keep the config.js file from being included in the combined and minified file, we make sure we call the ngconstant grunt task after the task that creates that minified file and we also make sure the file is generated into t he dist directory.
In order to put the include of config.js into the index.html, we pulled in another grunt plugin, file_append, and cause
it to add a <script> tag to pull in the config.js file at the very end of the build.
Branding Mechanism
Motivation
Another area where we needed to pull something out of the open source version of the UI, but want to be able to put it back, is with the Intuit and IDEA branding on the login page and the header area of all the other pages. This involves both some images and some CSS (to adjust the position of the login form, for example).
Implementation
Since we needed to override some CSS to make the positioning work, and to pull in the images, we added a file that will be loaded in the open source version by index.html, but which is empty. By putting the necessary image files in the right place and then putting the necessary CSS to adjust the login form and the header and to invoke those images in the file modules/ui/app/styles/branding.scss , you can customize those parts of the UI.
Use
header {
  .brandBanner {
       .brandContent {
        background: #373737 url(images/idea_horizontal_reversed_46.png) no-repeat right center !important;
     }
  }
}

.signinBox {
    div.signinLogo {
        margin-left: 0 !important;
        position: relative !important;
        padding-top: 5px !important;
        padding-left: 175px !important;
        background: white url(images/intuit_signin.png) no-repeat -10px 1px !important;
    }
}
In the case of our Intuit/IDEA branding, you need to put CSS like this in the branding.scss file (note: it is actually SCSS, which is processed by compass into a CSS file at build time):
Notice the copious use of “!important”. That is a CSS feature that causes those settings to override any equivalent setting that had already been specified in a previous CSS file. That is necessary because the branding.scss file content is pulled in by index.html after the normal CSS file, so we need to override any existing settings to make sure our customizations are used. Also notice the references to the two image files. They must be put in modules/ui/app/images .
Appendix
Note: you may need to be careful about copying and pasting this code, as newlines may be added in odd places.
plugins/personalization/ctrl.js
'use strict';

angular.module('wasabi.controllers').
    controllerProvider.register('PersonalizationCtrl', ['$scope', 'experiment', 'UtilitiesFactory', '$modalInstance',
        function ($scope, experiment, UtilitiesFactory, $modalInstance) {
            $scope.experiment = experiment;
            $scope.personalizationFormSubmitted = false;

            $scope.experiment.isPersonalizationEnabled = (experiment && experiment.hasOwnProperty('isPersonalizationEnabled') ? experiment.isPersonalizationEnabled : false);

            $scope.savePersonalization = function(isFormInvalid, theForm) {
                if (!isFormInvalid) {
                    $modalInstance.close();
                }
                else {
                    $scope.personalizationFormSubmitted = true;
                }
            };

            $scope.cancel = function() {
                $modalInstance.close();
            };
        }
]);
plugins/personalization/template.html
<div id="personalizationModal" class="modalDialog" style="width: 700px; left: 0;">
<h1>Personalization</h1>
<form name="personalizationForm" novalidate ng-submit="savePersonalization(personalizationForm.$invalid, personalizationForm);">
<div class="dialogContent">
<div>
<ul class="formLayout" ng-show="!readOnly">
<li>
<div style="width: 100%;">
<input id="chkPersonalization" name="chkPersonalization" type="checkbox" ng-model="experiment.isPersonalizationEnabled" ensure-personalization-model ng-checked="{{experiment.isPersonalizationEnabled}}"/> <label
for="chkPersonalization" class="checkboxLabel" name="isPersonalizationEnabled">This is a personalization experiment</label>
</div>
</li>
<li class="layout8020" ng-show="experiment.isPersonalizationEnabled">
<div style="width: 320px;">
<label>Model Name</label>
<input id="modelName" name="modelName" ng-model="experiment.modelName" class="form-control text" ng-pattern="/^[_\-\$A-Za-z][_\-\$A-Za-z0-9]*$/" ng-maxlength="64"/>
<!-- Validation error -->
<div class="error"
ng-show="personalizationForm.chkPersonalization.$modelValue == true &&
((personalizationForm.modelName.$dirty && personalizationForm.modelName.$invalid &&
!personalizationForm.modelName.$focused) ||
personalizationFormSubmitted)">
<small class="fieldError"
ng-show="personalizationForm.chkPersonalization.$error.ensurePersonalizationModel && !personalizationForm.modelName.$error.pattern">
Model name required.
</small>
</div>
<div class="error"
ng-show="(personalizationForm.modelName.$dirty && personalizationForm.modelName.$invalid &&
!personalizationForm.modelName.$focused) ||
(personalizationFormSubmitted &&
(personalizationForm.modelName.$error.required || personalizationForm.modelName.$error.pattern || personalizationForm.modelName.$error.maxlength))">
<small class="fieldError"
ng-show="personalizationForm.modelName.$error.pattern">
Invalid model name.
</small>
<small class="fieldError"
ng-show="personalizationForm.modelName.$error.maxlength">
Model name cannot be longer than 64 characters.
</small>
</div>
</div>
<div>
<label>Model Version</label>
<input id="modelVersion" name="modelVersion" ng-model="experiment.modelVersion" class="form-control text" ng-pattern="/^[_\-\$A-Za-z0-9][_\.\-\$A-Za-z0-9]*$/" ng-maxlength="64" />
<div class="error"
ng-show="(personalizationForm.modelVersion.$dirty && personalizationForm.modelVersion.$invalid &&
!personalizationForm.modelVersion.$focused) || personalizationFormSubmitted">
<small class="fieldError"
ng-show="personalizationForm.modelVersion.$error.pattern">
Invalid model version.
</small>
<small class="fieldError"
ng-show="personalizationForm.modelVersion.$error.maxlength">
Model version cannot be longer than 64 characters.
</small>
</div>
</div>
</li>
</ul>
<div ng-show="readOnly">
<label ng-show="experiment.isPersonalizationEnabled">Personalization is enabled for this experiment</label>
<label ng-show="!experiment.isPersonalizationEnabled">Personalization is <b>not</b> enabled for this experiment</label>
</div>
</div>
<div class="buttonBar">
<button id="btnSavePersonalization" class="blue cancel">Save</button>
<button id="btnSavePersonalizationCancel" class="cancel" onclick="return false;" ng-click="cancel();">Cancel</button>
</div>
</div>
</form>
</div>
plugins/personalization/detailsCtrl.js
'use strict';

angular.module('wasabi.controllers').
    controllerProvider.register('PersonalizationDetailsCtrl', ['$scope', 'experiment', 'UtilitiesFactory', '$modalInstance', 'ExperimentsFactory',
        function ($scope, experiment, UtilitiesFactory, $modalInstance, ExperimentsFactory) {
            $scope.experiment = experiment;
            $scope.personalizationFormSubmitted = false;

            $scope.data = {
                disablePersonalizationFields: true
            };

            $scope.experiment.isPersonalizationEnabled = (experiment && experiment.hasOwnProperty('isPersonalizationEnabled') ? experiment.isPersonalizationEnabled : false);

            $scope.savePersonalizationValues = function() {
                $scope.stringifiedPersonalization = JSON.stringify({
                    isPersonalizationEnabled: ($scope.experiment.isPersonalizationEnabled ? $scope.experiment.isPersonalizationEnabled : false),
                    modelName: ($scope.experiment.modelName ? $scope.experiment.modelName : ''),
                    modelVersion: ($scope.experiment.modelVersion ? $scope.experiment.modelVersion : '')
                });
            };

            $scope.restorePersonalizationValues = function(values) {
                return JSON.parse(values);
            };

            $scope.editPersonalization = function() {
                $scope.data.disablePersonalizationFields = false;
                $scope.$apply(); // Needed to poke Angular to update the fields based on that variable.
                $scope.savePersonalizationValues();
                return $scope.stringifiedPersonalization;
            };

            $scope.cancelPersonalization = function(tempValue) {
                var tmp = $scope.restorePersonalizationValues(tempValue);
                $scope.experiment.isPersonalizationEnabled = tmp.isPersonalizationEnabled;
                $scope.experiment.modelName = tmp.modelName;
                $scope.experiment.modelVersion = tmp.modelVersion;
                $scope.data.disablePersonalizationFields = true;
                $scope.experimentFormSubmitted = false;
                $scope.$apply();
            };

            // This function handles saving the personalization metadata when the checkbox is checked or unchecked.
            // If it is being checked, we need to validate that there is a model name provided.  In either case,
            // we need to set the value of data.disableModelFields so that the fields will be enabled or disabled
            // correctly, based on the state of the isPersonalizationEnabled flag.
            $scope.savePersonalization = function() {
                var experiment = $scope.experiment;
                $scope.personalizationFormSubmitted = true;
                $scope.$apply();
                if (experiment.isPersonalizationEnabled &&
                    (!experiment.modelName || $.trim(experiment.modelName).length === 0 ||
                    ($('#modelVersion').closest('div').find('.fieldError').length !==
                    $('#modelVersion').closest('div').find('.ng-hide').length))) {
                    // Need modelName, error already displayed,
                    // or the second test is a kludge because we don't have access to the $error from the form or
                    // fields here, so we just check if there are any unhidden error messages for the model version.

                    // Handle the problem that the dynamic edit widgets (the pencil, etc., buttons) collapse
                    // when you do a save...even if there is an error.  In the error case, we want them to show.
                    $('#personalizationToolbar').data('dynamicEdit').displayWidgets($('#personalizationToolbar .dynamicEdit'), false);
                    return;
                }
                var updates = {
                        id: experiment.id,
                        isPersonalizationEnabled: experiment.isPersonalizationEnabled,
                        modelName: experiment.modelName
                    };
                if (experiment.modelVersion && $.trim(experiment.modelVersion).length > 0) {
                    updates.modelVersion = $.trim(experiment.modelVersion);
                }
                else {
                    updates.modelVersion = '';
                }
                ExperimentsFactory.update(updates).$promise.then(function () {
                        $scope.data.disablePersonalizationFields = true;
                        UtilitiesFactory.trackEvent('saveItemSuccess',
                            {key: 'dialog_name', value: 'savePersonalizationFromDetails'},
                            {key: 'application_name', value: experiment.applicationName},
                            {key: 'item_id', value: experiment.id},
                            {key: 'item_label', value: experiment.label});
                    },
                    function(response) {
                        $scope.data.disablePersonalizationFields = true;
                        UtilitiesFactory.handleGlobalError(response);
                    }
                );
            };

            $scope.cancel = function() {
                $modalInstance.close();
            };
        }
]);
plugins/personalization/detailsTemplate.html
<div id="personalizationDetailsModal" class="modalDialog" style="width: 700px; left: 0;">
<h1>Personalization</h1>
<form name="personalizationForm">
<div class="dialogContent">
<div>
<div id="personalizationToolbar" ng-show="!readOnly" dynamic-edit input-tag="stringifiedPersonalization" select-function="savePersonalization" edit-function="editPersonalization" cancel-function="cancelPersonalization" ng-model="experiment.modelName" class="dynamicToolbar" style="top: 43px; left: 300px;"></div>
<ul class="formLayout oneCol" ng-show="!readOnly">
<li>
<div style="width: 100%;">
<input id="chkPersonalization" name="chkPersonalization" type="checkbox" ng-model="experiment.isPersonalizationEnabled" ensure-personalization-model ng-checked="{{experiment.isPersonalizationEnabled}}" ng-disabled="data.disablePersonalizationFields" ng-class="{disabled: data.disablePersonalizationFields}"/> <label
for="chkPersonalization" class="checkboxLabel" name="isPersonalizationEnabled" ng-class="{disabled: data.disablePersonalizationFields}">This is a personalization experiment</label>
</div>
</li>
<li class="layout8020" ng-show="experiment.isPersonalizationEnabled">
<div style="width: 320px;">
<label ng-class="{disabled: data.disablePersonalizationFields}">Model Name</label>
<input id="modelName" name="modelName" ng-model="experiment.modelName" class="form-control text" ng-pattern="/^[_\-\$A-Za-z][_\-\$A-Za-z0-9]*$/" ng-maxlength="64" ng-disabled="data.disablePersonalizationFields" ng-class="{disabled: data.disablePersonalizationFields}" />
<!-- Validation error -->
<div class="error"
ng-show="personalizationForm.chkPersonalization.$modelValue == true &&
((personalizationForm.modelName.$dirty && personalizationForm.modelName.$invalid &&
!personalizationForm.modelName.$focused) ||
personalizationFormSubmitted)">
<small class="fieldError"
ng-show="personalizationForm.chkPersonalization.$error.ensurePersonalizationModel && !personalizationForm.modelName.$error.pattern">
Model name required.
</small>
</div>
<div class="error"
ng-show="(personalizationForm.modelName.$dirty && personalizationForm.modelName.$invalid &&
!personalizationForm.modelName.$focused) ||
(personalizationFormSubmitted &&
(personalizationForm.modelName.$error.required || personalizationForm.modelName.$error.pattern || personalizationForm.modelName.$error.maxlength))">
<small class="fieldError"
ng-show="personalizationForm.modelName.$error.pattern">
Invalid model name.
</small>
<small class="fieldError"
ng-show="personalizationForm.modelName.$error.maxlength">
Model name cannot be longer than 64 characters.
</small>
</div>
</div>
<div>
<label ng-class="{disabled: data.disablePersonalizationFields}">Model Version</label>
<input id="modelVersion" name="modelVersion" ng-model="experiment.modelVersion" class="form-control text" ng-pattern="/^[_\-\$A-Za-z0-9][_\.\-\$A-Za-z0-9]*$/" ng-maxlength="64" ng-disabled="data.disablePersonalizationFields" ng-class="{disabled: data.disablePersonalizationFields}" />
<div class="error"
ng-show="(personalizationForm.modelVersion.$dirty && personalizationForm.modelVersion.$invalid &&
!personalizationForm.modelVersion.$focused) || personalizationFormSubmitted">
<small class="fieldError"
ng-show="personalizationForm.modelVersion.$error.pattern">
Invalid model version.
</small>
<small class="fieldError"
ng-show="personalizationForm.modelVersion.$error.maxlength">
Model version cannot be longer than 64 characters.
</small>
</div>
</div>
</li>
</ul>
<div class="buttonBar">
<button id="btnSavePersonalizationCancel" class="blue cancel" onclick="return false;" ng-click="cancel();">Close</button>
</div>
</div>
</div>
</form>
<div ng-show="readOnly">
<label ng-show="experiment.isPersonalizationEnabled">Personalization is enabled for this experiment</label>
<label ng-show="!experiment.isPersonalizationEnabled">Personalization is <b>not</b> enabled for this experiment</label>
</div>
</div>
plugins/tracking/factory.js
'use strict';
var globalWebSDKTrackingParams = {},
tracking = {
init: function() {
var that = this;
if (typeof(intuit) !== 'undefined') {
tracking.doInit();
}
else {
setTimeout(that.init, 1000);
}
},
doInit: function() {
// Initialize Web SDK tracking
window.webAnalyticsSDKTracker = new intuit.web.analytics();
window.webAnalyticsSDKTracker.init({
'cec_version': '1',
'app_name': 'Wasabi',
'offering_id': 'Wasabi',
'app_log_enable': false,
'app_force_crossdomain_tracking': true,
'app_force_crossdomain_tracking_timeout': 250,
'providers': {
'iac':{
'enable': true,
'clickstream_format_version': '1',
'server_endpoint': 'http://trinity-prfqdc.intuit.com/trinity/v1/idea-wasabicui-clickstream',
'server_endpoint_secure': 'https://trinity-prfqdc.intuit.com/trinity/v1/idea-wasabicui-clickstream'
},
'siteCatalyst' :{
'enable': false,
'server_endpoint': 'http://ci.intuit.com/b/ss/',
'server_endpoint_secure': 'https://sci.intuit.com/b/ss/'
}
},
'dom_events' : [
{
'css_selector': 'input[type=button]',
'event': 'click',
'standard': true
},
{
'css_selector': 'button',
'event': 'click',
'standard': true
},
{
'css_selector': 'a',
'event': 'click',
'standard': true
},
{
'event': 'load',
'standard': true
},
{
'css_selector': 'button#btnSearch', //Group of DOM elements to be tracked (Required for any DOM event except load)
'event': 'click', //DOM event (Required) supported types: click, change, focus, blur
'capture' : {
'iac': [
{
'sampling': true,
'inherit_from': ['page_parent_iac'],
'properties' : {
'event.event_name': 'click',
'event.event_category': 'dom',
'event.properties.pagination_item': 'page'
}
}
]
}
}
],
'custom_events': {
'saveItemSuccess': [ // Tracked when the save of an item, like an experiment, was successful.
{
'capture': {
'iac': [
{
'properties': {
'event.event_name': 'saveItemSuccess',
'event.dialog_name': '#DIALOG_NAME#',
'event.application_name': '#APPLICATION_NAME#',
'event.experiment_id': '#EXPERIMENT_ID#',
'event.item_id': '#ITEM_ID#',
'event.item_label': '#ITEM_LABEL#'
}
}
]
}
}
],
'updateItemSuccess': [ // Tracked when an item is updated.
{
'capture': {
'iac': [
{
'properties': {
'event.event_name': 'updateItemSuccess',
'event.dialog_name': '#DIALOG_NAME#',
'event.experiment_id': '#EXPERIMENT_ID#',
'event.item_value': '#ITEM_VALUE#'
}
}
]
}
}
],
'deleteItemSuccess': [ // Tracked when an item is deleted.
{
'capture': {
'iac': [
{
'properties': {
'event.event_name': 'deleteItemSuccess',
'event.dialog_name': '#DIALOG_NAME#',
'event.experiment_id': '#EXPERIMENT_ID#',
'event.item_id': '#ITEM_ID#'
}
}
]
}
}
],
'changeItemStateSuccess': [ // Tracked when an item's state is changed.
{
'capture': {
'iac': [
{
'properties': {
'event.event_name': 'changeStateSuccess',
'event.dialog_name': '#DIALOG_NAME#',
'event.experiment_id': '#EXPERIMENT_ID#',
'event.item_id': '#ITEM_ID#'
}
}
]
}
}
],
'closeBucketSuccess': [ // Tracked when a bucket is closed.
{
'capture': {
'iac': [
{
'properties': {
'event.event_name': 'closeBucketSuccess',
'event.dialog_name': '#DIALOG_NAME#',
'event.experiment_id': '#EXPERIMENT_ID#',
'event.item_label': '#ITEM_LABEL#'
}
}
]
}
}
],
'loadedDialog': [ // Tracked when a dialog is loaded.
{
'capture': {
'iac': [
{
'properties': {
'event.event_name': 'loadedDialog',
'event.dialog_name': '#DIALOG_NAME#',
'event.application_name': '#APPLICATION_NAME#'
}
}
]
}
}
],
'canceledDialog': [ // Tracked when a dialog is closed without save.
{
'capture': {
'iac': [
{
'properties': {
'event.event_name': 'canceledDialog',
'event.dialog_name': '#DIALOG_NAME#'
}
}
]
}
}
],
'advancedSearch': [ // Tracked when an advanced search is done (Go button clicked).
{
'capture': {
'iac': [
{
'properties': {
'event.event_name': 'advancedSearch',
'event.search_parms': '#SEARCH_PARMS#'
}
}
]
}
}
],
'saveRolesSuccess': [ // Tracked when the save of an item, like an experiment, was successful.
{
'capture': {
'iac': [
{
'properties': {
'event.event_name': 'saveRolesSuccess',
'event.dialog_name': '#DIALOG_NAME#',
'event.application_name': '#APPLICATION_NAME#',
'event.item_id': '#ITEM_ID#',
'event.item_role': '#ITEM_ROLE#'
}
}
]
}
}
],
'deleteRolesSuccess': [ // Tracked when an item is deleted.
{
'capture': {
'iac': [
{
'properties': {
'event.event_name': 'deleteRolesSuccess',
'event.dialog_name': '#DIALOG_NAME#',
'event.application_name': '#APPLICATION_NAME#',
'event.item_id': '#ITEM_ID#',
'event.item_role': '#ITEM_ROLE#'
}
}
]
}
}
]
},
'inheritances' : {},
'parameters' : { // These tie the data saved when tracking to a global var, necessary because the tracking is asynch so you can only point the Web SDK at something that it can pull the value from.
'SCREEN_ID': {
'values': [
{'js_var': 'screen_id'}
]
},
'DIALOG_NAME': {
'values': [
{'js_var': 'globalWebSDKTrackingParams.dialog_name'}
]
},
'APPLICATION_NAME': {
'values': [
{'js_var': 'globalWebSDKTrackingParams.application_name'}
]
},
'EXPERIMENT_ID': {
'values': [
{'js_var': 'globalWebSDKTrackingParams.experiment_id'}
]
},
'ITEM_ID': {
'values': [
{'js_var': 'globalWebSDKTrackingParams.item_id'}
]
},
'ITEM_LABEL': {
'values': [
{'js_var': 'globalWebSDKTrackingParams.item_label'}
]
},
'ITEM_VALUE': {
'values': [
{'js_var': 'globalWebSDKTrackingParams.item_value'}
]
},
'ITEM_ROLE': {
'values': [
{'js_var': 'globalWebSDKTrackingParams.item_role'}
]
},
'RESPONSE_STATUS': {
'values': [
{'js_var': 'globalWebSDKTrackingParams.response_status'}
]
},
'RESPONSE_DATA': {
'values': [
{'js_var': 'globalWebSDKTrackingParams.response_data'}
]
},
'SEARCH_PARMS': {
'values': [
{'js_var': 'globalWebSDKTrackingParams.search_parms'}
]
},
'PAGINATION_ITEM': {
'values': [
{
'element': { //Get value from a DOM element
'element_id': 'self', //Any element ID or "self" (element that triggers the DOM event). "self" can be used in DOM_events's properties only.
'element_property': 'innerHtml' //Get value from the DOM element's property
}
}
]
}
}
});
},
reset: function() {
function doInitNow() {
if (window.webAnalyticsSDKTracker) {
window.webAnalyticsSDKTracker.resetListeners();
}
}
setTimeout(doInitNow, 100);
},
trackEvent: function(eventName, parm1, parm2, parm3, parm4) {
if (parm1) {
globalWebSDKTrackingParams[parm1.key] = parm1.value;
}
if (parm2) {
globalWebSDKTrackingParams[parm2.key] = parm2.value;
}
if (parm3) {
globalWebSDKTrackingParams[parm3.key] = parm3.value;
}
if (parm4) {
globalWebSDKTrackingParams[parm4.key] = parm4.value;
}
webAnalyticsSDKTracker.triggerEvent(eventName);
}
};
tracking.init();