Trapheus

Restore RDS instances in AWS without worrying about client downtime or configuration retention.
Trapheus can restore individual RDS instance or a RDS cluster.
Modelled as a state machine, with the help of AWS step functions, Trapheus restores the RDS instance in a much faster way than the usual SQL dump preserving the same instance endpoint and confgurations as before.

![]()

| 简体中文 | français |
- Important: this application uses various AWS services and there are costs associated with these services after the Free Tier usage - please see the AWS pricing page for details.

Table of Contents
- ➤ Pre-Requisites
- ➤ Parameters
- ➤ Tagging
- ➤ Instructions
- ➤ Execution
- ➤ How it Works
- ➤ Contributing to Trapheus
- ➤ Blogs
- ➤ Contributors
Pre-Requisites
The app requires the following AWS resources to exist before installation:
-
python3.11installed on local machine following this. - Configure AWS SES
- Configure the SES sender and receiver email (SES Console->Email Addresses).
- An SES email alert is configured to notify the user about any failures in the state machine. The sender email parameter is needed to configure the email ID through which the alert is sent out. The receiver email parameter is needed to set the email ID to which the alert is sent.
- Configure the SES sender and receiver email (SES Console->Email Addresses).
- Create the S3 bucket where the system is going to store the cloud formation templates:
- Proposed Name: trapheus-cfn-s3-[account-id]-[region]. It is recommended that the name contains your:
- account-id, as the bucket names need to be global (prevents someone else having the same name)
- region, to easily keep track when you have trapheus-s3 buckets in multiple regions
- Proposed Name: trapheus-cfn-s3-[account-id]-[region]. It is recommended that the name contains your:
- A VPC (region specific). The same VPC/region should be used for both the RDS instance(s), to be used in Trapheus, and Trapheus’ lambdas.
- Region selection consideration. Regions that support:
- Email receiving . Check Parameters -> ‘RecipientEmail’ for more.
- Example minimal VPC setup:
- VPC console:
- name: Trapheus-VPC-[region] (specify the [region] where you VPC is created - to easily keep track when you have Trapheus-VPCs in multiple regions)
- IPv4 CIDR block: 10.0.0.0/16
- VPC console->Subnets page and create two private subnets:
- Subnet1:
- VPC: Trapheus-VPC-[region]
- Availability Zone: choose one
- IPv4 CIDR block: 10.0.0.0/19
- Subnet2:
- VPC: Trapheus-VPC-[region]
- Availability Zone: choose a different one than the Subnet1 AZ.
- IPv4 CIDR block: 10.0.32.0/19
- Subnet1:
- You have created a VPC with only two private subnets. If you are creating non-private subnets, check the ratio between private, public subnets, private subnet with dedicated custom network ACL and spare capacity.
- VPC console:
- Region selection consideration. Regions that support:
- One or more instances of an RDS database that you wish to restore.
- Example minimal free RDS setup:
- Engine options: MySQL
- Templates: Free tier
- Settings: enter password
- Connectivity: VPC: Trapheus-VPC-[region]
- Example minimal free RDS setup:
Parameters
The following are the parameters for creating the cloudformation template:
--s3-bucket: [Optional] The name of the CloudFormation template S3 bucket from the Pre-Requisites.vpcID: [Required] The id of the VPC from the Pre-Requisites. The lambdas from the Trapheus state machine will be created in this VPC.Subnets: [Required] A comma separated list of private subnet ids (region specific) from the Pre-Requisites VPC.SenderEmail: [Required] The SES sending email configured in the Pre-RequisitesRecipientEmail: [Required] Comma separated list of recipient email addresses configured in Pre-Requisites.UseVPCAndSubnets: [Optional] Whether to use the vpc and subnets to create a security group and link the security group and vpc to the lambdas. When UseVPCAndSubnets left out (default) or set to ‘true’, lambdas are connected to a VPC in your account, and by default the function can’t access the RDS (or other services) if VPC doesn’t provide access (either by routing outbound traffic to a NAT gateway in a public subnet, or having a VPC endpoint, both of which incur cost or require more setup). If set to ‘false’, the lambdas will run in a default Lambda owned VPC that has access to RDS (and other AWS services).SlackWebhookUrls: [Optional] Comma separated list of Slack webhooks for failure alerts.
Tagging
This section describes the currently supported set of tags and how to take advantage of them in support of common use cases around billing insight generation.
Tags provide additional means of grouping and subdividing costs, whether for the purposes of analysis or cost distribution. Explanations for how tags can be applied to resources inside AWS is provided here. To facilitate a consistent approach to handling known and foreseen use cases, the following tags has been added at stack level and as well as at resource levels.
AppName - Name of the application, default Trapheus
AppComponent - Name of the component, since this application targeted for DB restore, default component database
AppFunction - Application function name, default RestoreDB
If you would like to change above defaults, change it in samconfig.toml
Every resource has tags as well, which override the default tag.
For example:
  Tags:
    AppComponent: "Lambda"
    AppFunction: "RenameDBInstance"
Instructions
Setup
To setup the Trapheus in your AWS account, follow the steps below:
- Clone the Trapheus Git repository
- AWS Credentials configuration. Trapheus uses boto3 as client library to talk with Amazon Web Services. Feel free to use any environment variables that boto3 supports to supply authentication credentials.
- Run
pip install -r requirements.txtto install the dependency graph - Run
python install.py
Still facing an issue? Check the Issues section or open a new issue
The above will setup a CFT in your AWS account with the name provided during installation.
TO BE NOTED: The CFT creates the following resources:
- DBRestoreStateMachine Step function state machine
- Multiple lambdas to execute various steps in the state machine
- LambdaExecutionRole: used across all lambdas to perform multiple tasks across RDS
- StatesExecutionRole: IAM role with permissions for executing the state machine and invoking lambdas
- S3 bucket: rds-snapshots-
where snapshots will be exported to - KMS key: is required to start export task of snapshot to s3
- DBRestoreStateMachineEventRule: A Cloudwatch rule in disabled state, that can be used following above instructions based on user requirement
- CWEventStatesExecutionRole: IAM role used by DBRestoreStateMachineEventRule CloudWatch rule, to allow execution of the state machine from CloudWatch
To set up the step function execution through a scheduled run using CloudWatch rule, follow the steps below:
- Go to DBRestoreStateMachineEventRule section in the template.yaml of the Trapheus repo.
- We have set it as a scheduled cron rule to run every FRIDAY at 8:00 AM UTC. You can change it to your preferred schedule frequency by updating the ScheduleExpression property’s value accordingly. Examples:
- To run it every 7 days,
ScheduleExpression: "rate(7 days)" - To run it every FRIDAY at 8:00 AM UTC,
ScheduleExpression: "cron(0 8 ? * FRI *)"
Click here for all details on how to set ScheduleExpression.
- To run it every 7 days,
-
Sample targets given in the template file under Targets property for your reference has to be updated:
a. Change Input property according to your Input property values, accordingly give a better ID for your target by updating the Id property.
b. Based on the number of targets for which you want to set the schedule, add or remove the targets.
- Change the State property value to ENABLED
- Lastly, package and redeploy the stack following steps 2 and 3 in Trapheus setup
Execution
To execute the step function, follow the steps below:
- Navigate to the State machine definition from the Resources tab in the cloudformation stack.
- Click on Start Execution.
- Under Input, provide the following json as parameter:
{
 "identifier": "<identifier name>",
 "task": "<taskname>",
 "isCluster": true or false
}
a.
identifier: (Required - String) The RDS instance or cluster identifier that has to be restored. Any type of RDS instance or Amazon aurora clusters are supported in this.
b. task: (Required - String) Valid options are create_snapshot or db_restore or create_snapshot_only.
c. isCluster: (Required - Boolean) Set to true if the identifier provided is of a cluster else set to false
The state machine can do one of the following tasks:
- if
taskis set tocreate_snapshot, the state machine creates/updates a snapshot for the given RDS instance or cluster using the snapshot identifier: identifier-snapshot and then executes the pipeline - if
taskis set todb_restore, the state machine does a restore on the given RDS instance, without updating a snapshot, assuming there is an existing snapshot with an identifier: identifier-snapshot - if
taskis set tocreate_snapshot_only, the state machine creates/updates a snapshot for the given RDS instance or cluster using the snapshot identifier: identifier-snapshot and it would not execute the pipeline
Cost considerations
After done with development or using the tool:
- if you don’t need the RDS instance when not coding or using the tool (for instance, if it is a test RDS), consider stopping or deleting the database. You can always recreate it when you need it.
- if you don’t need the past Cloud Formation templates, it is recommended you empty the CFN S3 bucket.
Tear down
To tear down your application and remove all resources associated with the Trapheus DB Restore state machine, follow these steps:
- Log into the Amazon CloudFormation Console and find the stack you created.
- Delete the stack. Note that stack deletion will fail if rds-snapshots-
s3 bucket is not empty, so first delete the snapshots' exports in the bucket. - Delete the AWS resources from the Pre-Requisites. Removal of SES, the CFN S3 bucket (empty it if not deleting) and VPC is optional as you won’t see charges, but can re-use them later for a quick start.
How it Works
Complete Pipeline
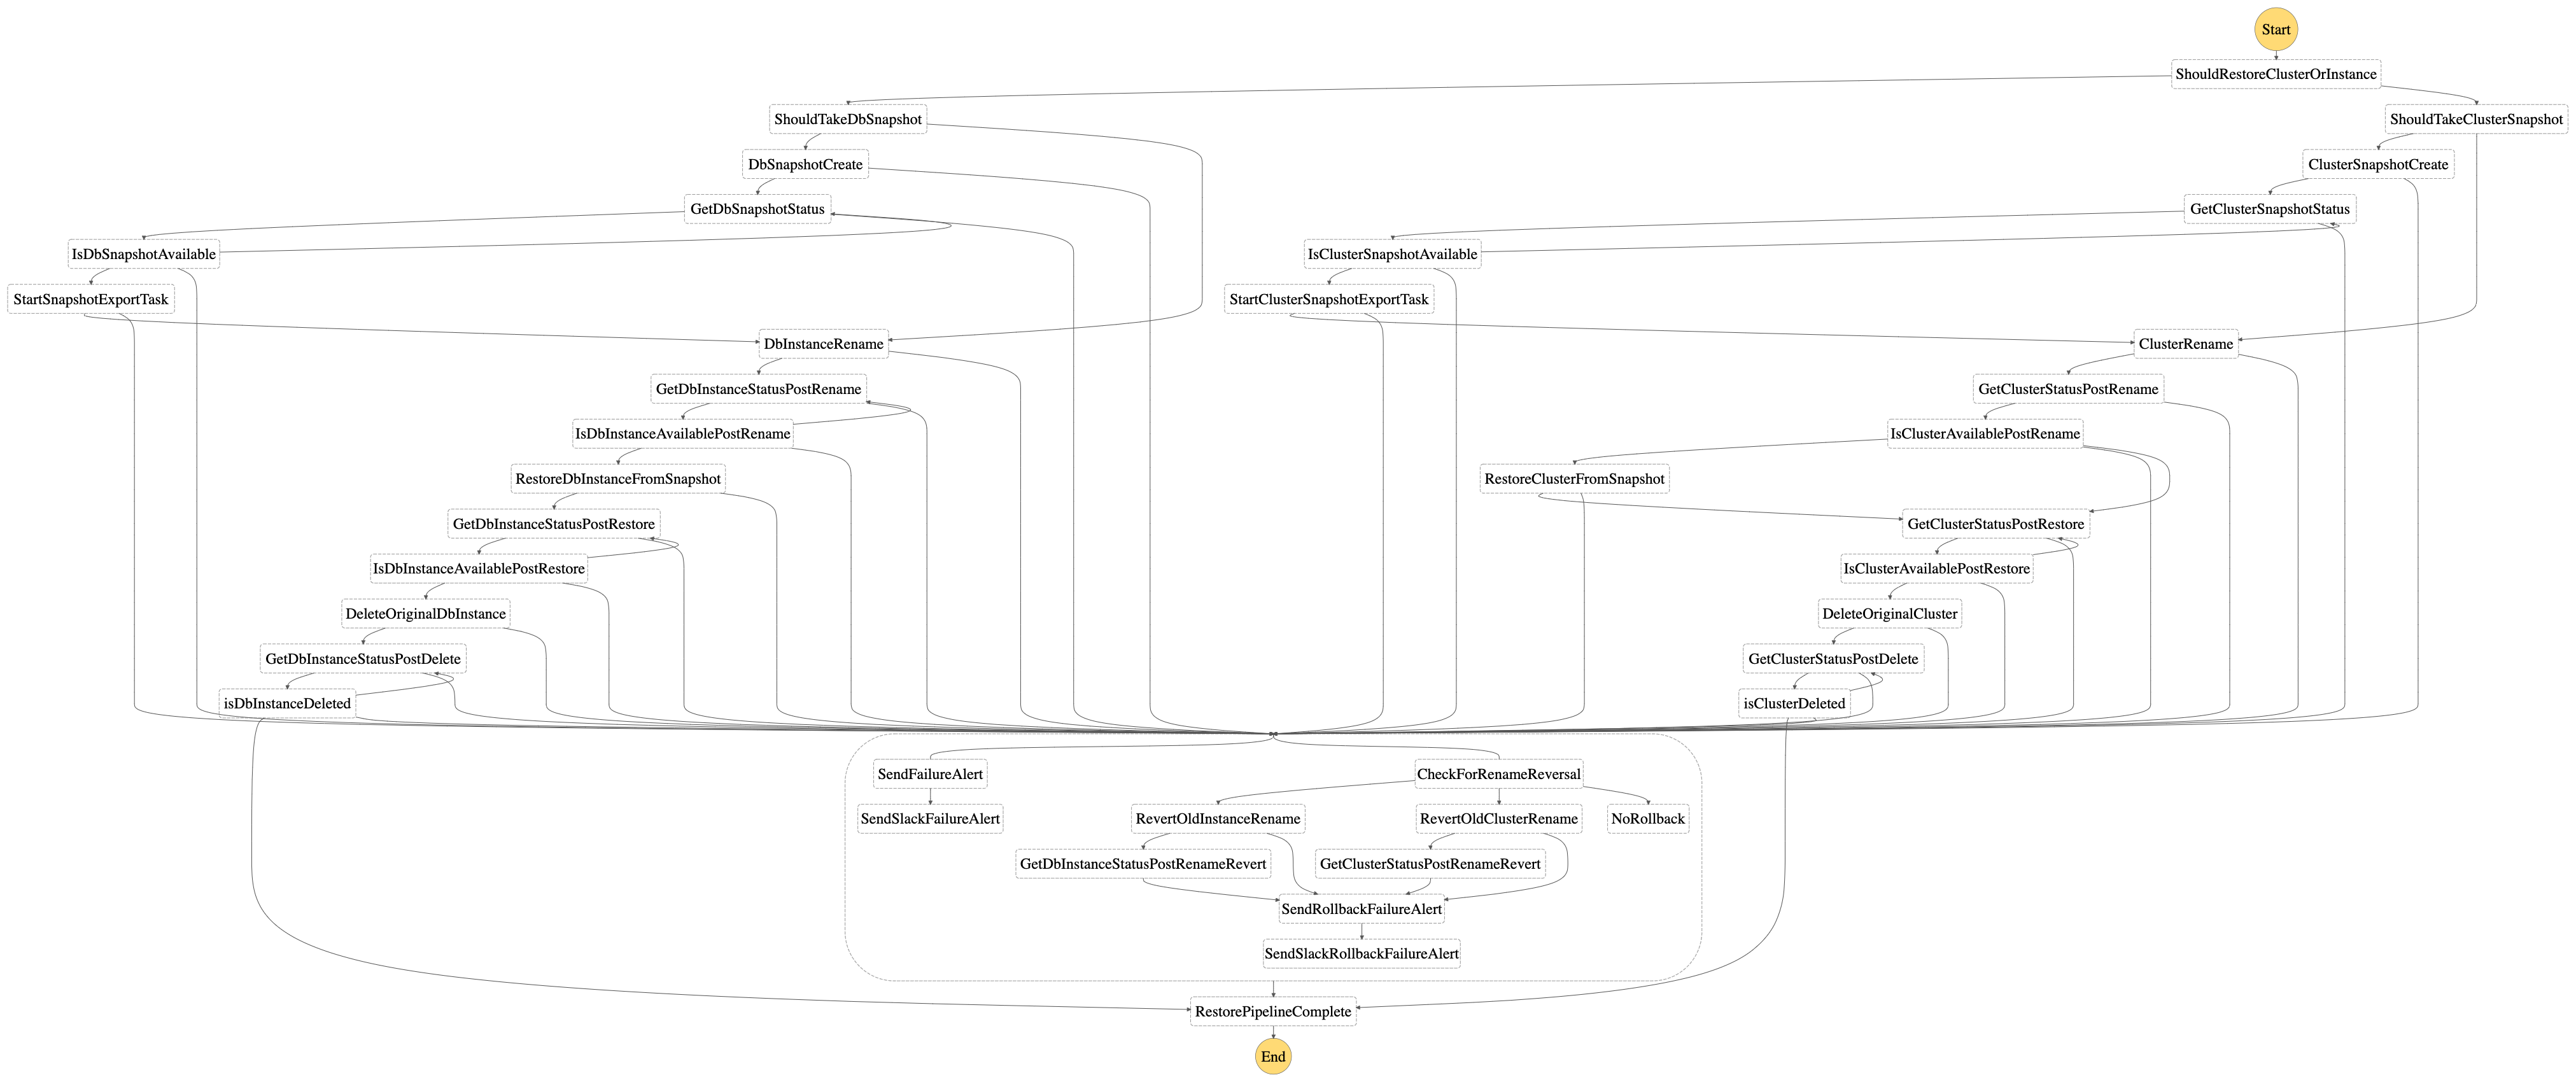
Modelled as a state machine, different steps in the flow such as snapshot creation/updation, instance rename, restore and deletion, completion/failure status of each operation, failure email alert, etc. are executed using individual lambdas for db instances and db clusters respectively. To track completion/failure of each operation, RDS waiters are used with delays and maximum retry attempts configured based on the lambda timeout. For scenarios of DB cluster availability and deletion, custom waiters have been defined. Lambda layers are used across all lambdas for common utility methods and custom exception handling.
Based on the input provided to the DBRestoreStateMachine step function, the following steps/branches are executed:
-
Using the
isClustervalue, a branching takes place in the state machine to execute the pipeline for a db cluster or for a db instance. -
If
taskis set tocreate_snapshot, the snapshot creation/updation process takes place for a cluster or instance respectively. Creates a snapshot using the unique identifier: identifier-snapshot, if it does not exist. If a snapshot already exists with the aforementioned identifier, it is deleted and a new snapshot is created. Post the new snapshot creation, the db restoration pipeline executes. -
If
taskis set todb_restore, the db restoration process starts, without a snapshot creation/updation -
If
taskis set tocreate_snapshot_only, the snapshot creation/updation process only takes place for a cluster or instance respectively. Creates a snapshot using the unique identifier: identifier-snapshot, if it does not exist. If a snapshot already exists with the aforementioned identifier, it is deleted and a new snapshot is created. In this scenario, the db restoration pipeline is not started. -
As part of the db restoration process, the first step is a Rename of the provided db instance or db cluster and its corresponding instances to a temporary name. Wait for successful completion of the rename step to be able to use the provided unique
identifierin the restoration step. -
Once the rename step is complete, next step is to Restore the db-instance or db-cluster using the
identifierparameter and the snapshot id as identifier-snapshot -
Once the restore is complete and the db-instance or db-cluster is available, the final step is to Delete the initially renamed instance or cluster (along with its instances) which was retained for failure handling purposes. Executed using lambdas created for deletion purposes, once the deletion is successful, the pipeline is complete.
-
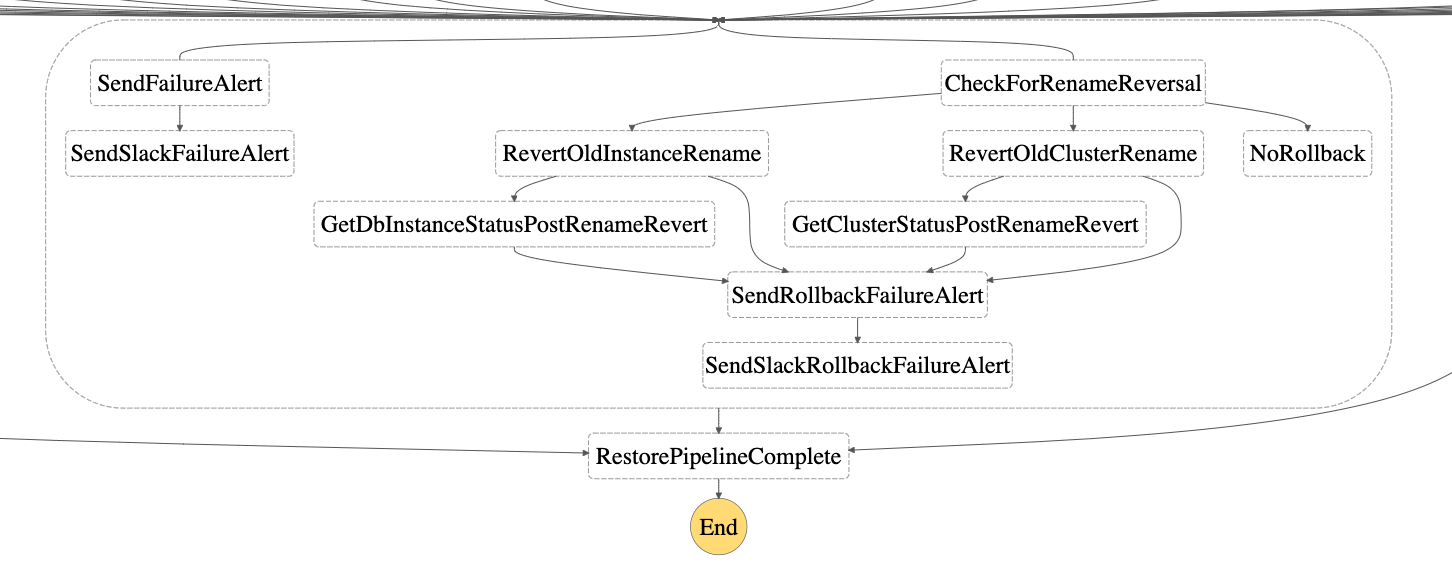
At any step, the retries with backoff and failure alerts are handled in every step of the state machine. If there is an occurrence of a failure, an SES email alert is sent as configured during the setup. Optionally, if
SlackWebhookUrlswas provided in the setup, failure notifications will also be sent to the appropriate channels. -
If the restore step fails, as part of failure handling, the Step-4 of instance/cluster rename is reverted to ensure that the original db-instance or db cluster is available for use.
Contributing to Trapheus
Reference Code Structure
├── LICENSE.md                                        <-- The MIT license.
├── README.md                                         <-- The Readme file.
├── docs                                              <-- The Readme files
│   ├── README.fr.md
│   └── README.zh-CN.md
├── install.py
├── presentation
│   └── Trapheus.pptx
├── requirements.txt
├── screenshots                                       <-- Folder for screenshots of the state machine.
│   ├── Trapheus.gif
│   ├── Trapheus.png
│   ├── cluster_restore.png
│   ├── cluster_snapshot_branch.png
│   ├── failure_handling.png
│   ├── instance_restore.png
│   ├── instance_snapshot_branch.png
│   ├── isCluster_branching.png
│   └── restore_state_machine.png
├── setup.py
├── src
│   ├── checkstatus
│   │   ├── DBClusterStatusWaiter.py                  <-- Python Waiter(https://boto3.amazonaws.com/v1/documentation/api/latest/guide/clients.html#waiters) for checking the status of the cluster
│   │   ├── get_dbcluster_status_function.py          <-- Python Lambda code for polling the status of a clusterised database
│   │   ├── get_dbstatus_function.py                  <-- Python Lambda code for polling the status of a non clusterised RDS instance
│   │   └── waiter_acceptor_config.py                 <-- Config module for the waiters
│   ├── common                                        <-- Common modules across the state machine deployed as a AWS Lambda layer.
│   │   ├── common.zip
│   │   └── python
│   │       ├── constants.py                          <-- Common constants used across the state machine.
│   │       ├── custom_exceptions.py                  <-- Custom exceptions defined for the entire state machine.
│   │       └── utility.py                            <-- Utility module.
│   ├── delete
│   │   ├── cluster_delete_function.py                <-- Python Lambda code for deleting a clusterised database.
│   │   └── delete_function.py                        <-- Python Lambda code for deleting a non clusterised RDS instance.
│   ├── emailalert
│   │   └── email_function.py                         <-- Python Lambda code for sending out failure emails.
│   ├── export
│   │   ├── export_cluster_snapshot_s3_function.py    <-- Python Lambda code for exporting db cluster snapshot to S3.
│   │   └── export_snapshot_s3_function.py            <-- Python Lambda code for exporting db instance snapshot to S3.
│   ├── rename
│   │   ├── cluster_rename_function.py                <-- Python Lambda code for renaming a clusterised database.
│   │   └── rename_function.py                        <-- Python Lambda code for renaming a non-clusterised RDS instance.
│   ├── restore
│   │   ├── cluster_restore_function.py               <-- Python Lambda code for retoring a clusterised database.
│   │   └── restore_function.py                       <-- Python Lambda code for restoring a non-clusterised RDS instance
│   ├── slackNotification
│   │   └── slack_notification.py                     <-- Python Lambda code for sending out a failure alert to configured webhook(s) on Slack.
│   └── snapshot
│       ├── cluster_snapshot_function.py              <-- Python Lambda code for creating a snapshot of a clusterised database.
│       └── snapshot_function.py                      <-- Python Lambda code for creating a snapshot of a non-clusterised RDS instance.
├── template.yaml                                     <-- SAM template definition for the entire state machine.
└── tests
    └── unit
        ├── checkstatus
        │   ├── test_get_dbcluster_status_function.py
        │   └── test_get_dbstatus_function.py
        ├── delete
        │   ├── test_cluster_delete_function.py
        │   └── test_delete_function.py
        ├── emailalert
        │   └── test_email_function.py
        ├── export
        │   ├── test_export_cluster_snapshot_s3_function.py
        │   └── test_export_snapshot_s3_function.py
        ├── rename
        │   ├── test_cluster_rename_function.py
        │   └── test_rename_function.py
        ├── restore
        │   ├── test_cluster_restore_function.py
        │   └── test_restore_function.py
        ├── slackNotification
        │   └── test_slack_notification.py
        └── snapshot
            ├── test_cluster_snapshot_function.py
            └── test_snapshot_function.py
Prepare your environment. Install tools as needed.
- Git Bash used to run Git from Command Line.
- Github Desktop Git desktop tool for managing pull requests, branches and repos.
- Visual Studio Code Full visual editor. Extensions for GitHub can be added.
- Or an editor of your choice.
- Fork Trapheus repo
- Create a working branch.
git branch trapheus-change1 - Confirm working branch for changes.
git checkout trapheus-change1You can combine both commands by typing
git checkout -b trapheus-change1. - Make changes locally using an editor and add unit tests as needed.
- Run the test suite in the repo to ensure existing flows are not breaking.
cd Trapheus python -m pytest tests/ -v #to execute the complete test suite python -m pytest tests/unit/test_get_dbstatus_function.py -v #to execute any individual test - Stage edited files.
git add contentfile.mdOr use
git add .for multiple files. - Commit changes from staging.
git commit -m "trapheus-change1" - Push new changes to GitHub
git push --set-upstream origin trapheus-change1 - Verify status of branch
git statusReview
Outputto confirm commit status. - Git push
git push --set-upstream origin trapheus-change1 - The
Outputwill provide a link to create your Pull Request.
Blogs
Maintainers
- Namita Devadas (@namitad)
Contributors